When it comes to working out, it's important to have a plan in place. One of the most important decisions you will make is choosing which exercises to do. Two popular exercises that are often debated are seated curls and standing curls. Both exercises have their benefits and drawbacks, and the best one for you depends on your goals and fitness level.
Seated Curls
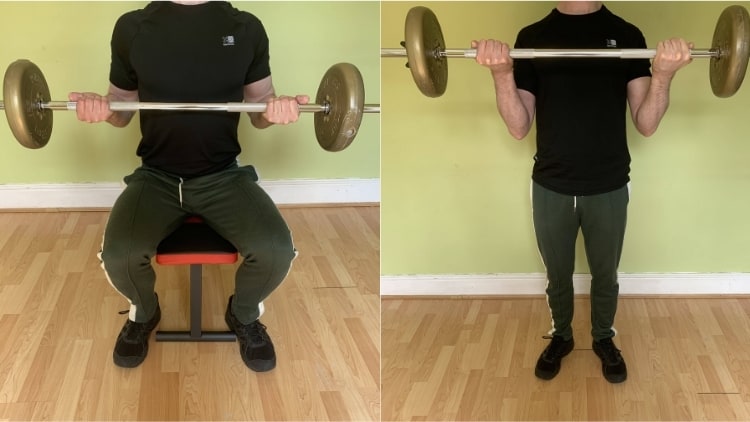
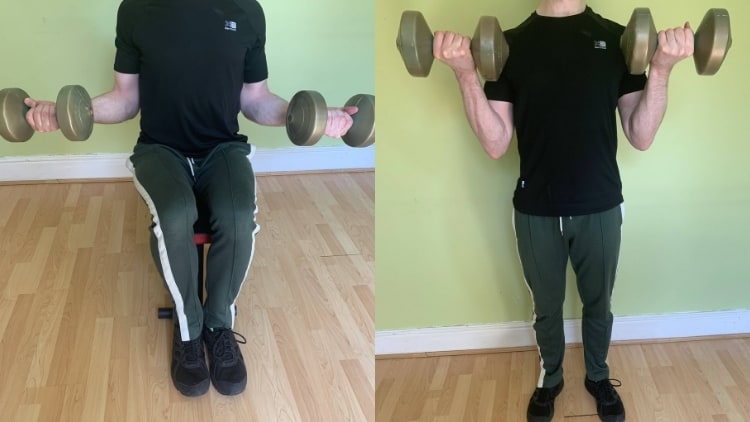
Seated curls are performed while sitting on a bench with your feet flat on the ground. You hold a dumbbell in each hand with your palms facing up and your elbows resting on your thighs. You then curl the weights towards your shoulders, keeping your elbows stationary. This exercise primarily targets your biceps, but it also works your forearms and shoulders.
One of the benefits of seated curls is that they isolate your biceps. Since your elbows are resting on your thighs, you can't cheat by swinging your arms. This means that you can really focus on your biceps and get a good contraction. Seated curls are also a good option if you have back problems or if you want to take the pressure off your lower back.
However, seated curls also have some drawbacks. Since you are sitting down, you are not engaging your core or lower body. This means that you are not burning as many calories as you would with standing curls. Additionally, seated curls can be more difficult to perform with heavier weights since you are limited by the strength of your thighs.
Standing Curls
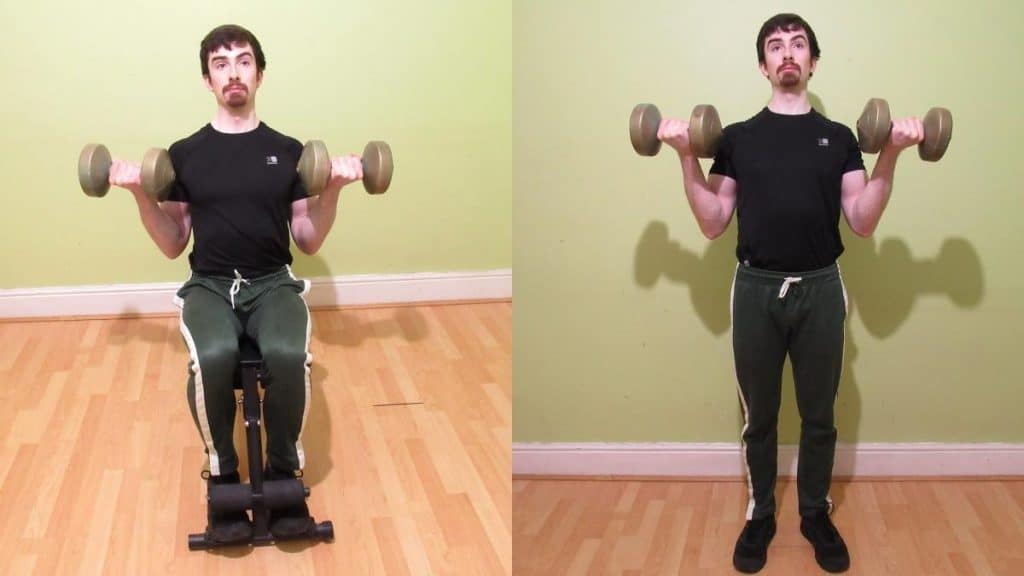
Standing curls are performed while standing with your feet shoulder-width apart. You hold a dumbbell in each hand with your palms facing up and your arms hanging by your sides. You then curl the weights towards your shoulders, keeping your elbows stationary. This exercise primarily targets your biceps, but it also works your forearms and shoulders.
One of the benefits of standing curls is that they engage your core and lower body. Since you are standing up, you are using more muscles to stabilize your body. This means that you are burning more calories than you would with seated curls. Additionally, standing curls allow you to use heavier weights since you are not limited by the strength of your thighs.
However, standing curls also have some drawbacks. Since you are standing up, you may be more likely to cheat by swinging your arms. This means that you may not be getting a good contraction in your biceps. Additionally, standing curls can be more difficult to perform if you have back problems or if you want to take the pressure off your lower back.
Which One Should You Choose?
So, which one should you choose? The answer depends on your goals and fitness level. If you want to isolate your biceps and take the pressure off your lower back, seated curls may be the better option for you. However, if you want to engage your core and lower body and burn more calories, standing curls may be the better option.
Ultimately, the best exercise for you is the one that you enjoy and that you can perform safely and effectively. You should also vary your workout routine to avoid plateaus and to target different muscle groups. Whether you choose seated curls, standing curls, or both, make sure that you are using proper form and that you are challenging yourself with progressive overload.
Conclusion
Seated curls and standing curls are both effective exercises for targeting your biceps, forearms, and shoulders. The best one for you depends on your goals and fitness level. Seated curls isolate your biceps and take the pressure off your lower back, while standing curls engage your core and lower body and burn more calories. Whether you choose seated curls, standing curls, or both, make sure that you are using proper form and that you are challenging yourself with progressive overload.
Related video of Seated Curls Vs Standing
If you're looking to build a stronger back and core, the seated row is a great exercise to include in your workout routine. This exercise targets several muscle groups, including the back, shoulders, arms, and core, making it a versatile and effective exercise for anyone looking to increase strength and muscle mass.
What is a Seated Row?

A seated row is a resistance training exercise performed using a cable machine or a rowing machine. The exercise involves sitting with your legs extended, grabbing the handles or the bar, and pulling back towards your torso while keeping your back straight.
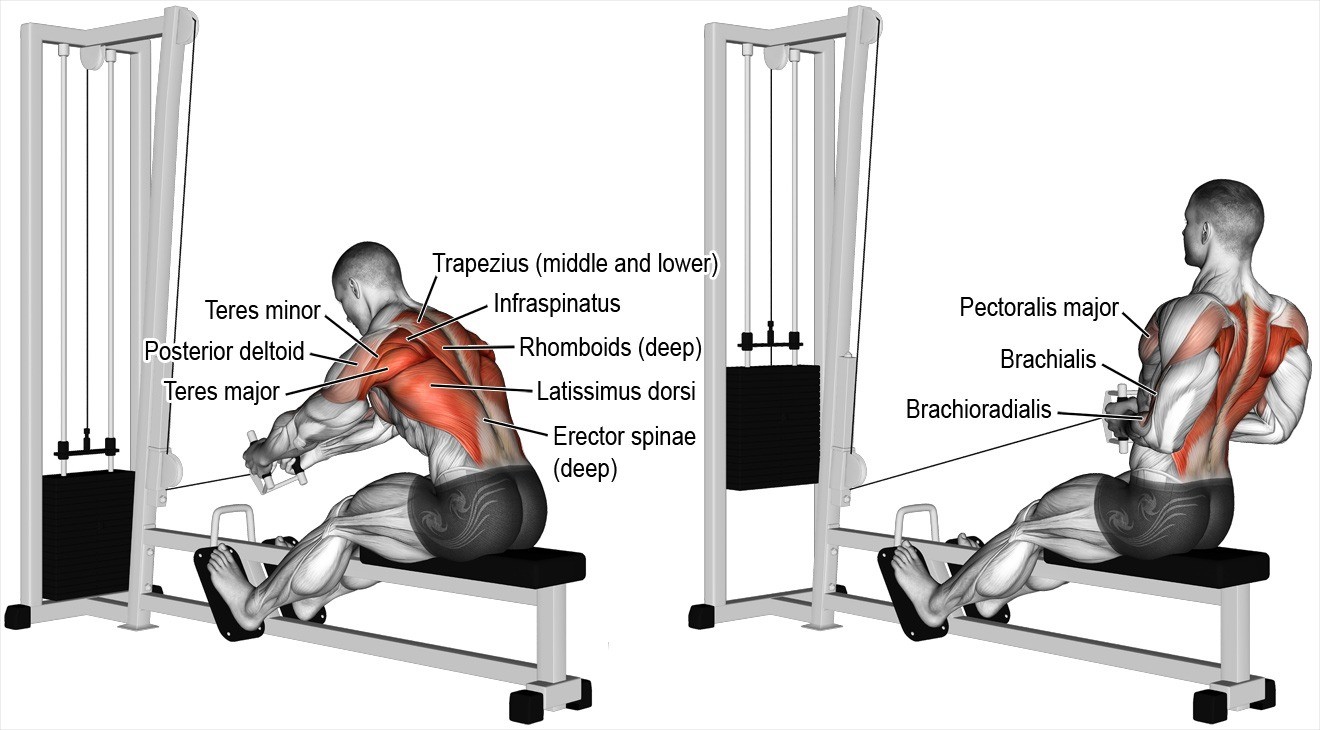
Back Muscles Worked in Seated Row

The primary muscle group worked during the seated row is the back muscles. These include the latissimus dorsi, which is the largest muscle in the back, the rhomboids, which are located between the shoulder blades, and the trapezius, which is located at the top of the back.
The seated row also targets the erector spinae, which is a group of muscles that run along the spine and help to stabilize the back during movement. This muscle group is particularly important for maintaining good posture and preventing back pain.
Shoulder and Arm Muscles Worked in Seated Row

In addition to the back muscle groups, the seated row also targets the shoulders and arms. The primary muscles worked in these areas are the deltoids, which are located at the top of the shoulders, and the biceps, which are located on the front of the upper arm.
Core Muscles Worked in Seated Row
The seated row is also an excellent exercise for strengthening the core muscles. These include the rectus abdominis, which is the "six-pack" muscle, and the obliques, which are located on the sides of the torso.
By engaging the core muscles during the seated row exercise, you can improve your overall stability and balance, which can help to prevent injuries and improve performance in other exercises.
Variations of Seated Row

There are several variations of the seated row exercise that can help to target different muscle groups or add variety to your workout routine. Some of these variations include:
- Close-grip seated row
- Wide-grip seated row
- Reverse-grip seated row
- One-arm seated row
- Cable seated row
By incorporating these variations into your workout routine, you can ensure that you are targeting all of the major muscle groups in your back, shoulders, arms, and core.
Conclusion
The seated row is a versatile and effective exercise that targets several muscle groups, including the back, shoulders, arms, and core. By adding this exercise to your workout routine and incorporating variations, you can improve your overall strength and muscle mass while reducing the risk of injury.
Related video of What Muscles Does Seated Row Work?

If you're looking for an exercise that can help you build strong arms, then the curl to press exercise is definitely worth considering. This exercise targets your biceps, triceps, and shoulders all at once, making it an incredibly efficient way to get the most out of your workouts. In this article, we'll take a closer look at how to perform the curl to press exercise, the benefits it offers, and some tips to help you get the most out of this exercise.
What is the Curl to Press Exercise?

The curl to press exercise is a compound exercise that combines a bicep curl and an overhead press. It involves curling the weight up to shoulder height and then pressing the weight overhead. This exercise is typically performed using dumbbells, but it can also be done with a barbell or resistance bands.
How to Perform the Curl to Press Exercise

To perform the curl to press exercise, follow these steps:
- Stand with your feet shoulder-width apart and hold dumbbells in each hand with your palms facing forward.
- Curl the weights up to shoulder height, keeping your elbows close to your body.
- Once the weights are at shoulder height, rotate your palms so they are facing forward.
- Press the weights overhead, straightening your arms completely.
- Lower the weights back down to shoulder height.
- Rotate your palms back to the starting position.
- Lower the weights back down to your sides.
Repeat this movement for several repetitions, focusing on maintaining proper form throughout the exercise.
Benefits of the Curl to Press Exercise

The curl to press exercise offers a number of benefits, including:
- Targets multiple muscle groups: This exercise targets your biceps, triceps, and shoulders all at once, making it an incredibly efficient way to get the most out of your workouts.
- Increased strength: By targeting multiple muscle groups, the curl to press exercise can help you build overall strength in your upper body.
- Burns calories: Because this exercise targets multiple muscle groups, it can help you burn more calories than exercises that only target a single muscle group.
- Improves muscle definition: By working multiple muscle groups, the curl to press exercise can help you achieve a more defined and toned appearance.
Tips for Performing the Curl to Press Exercise

To get the most out of the curl to press exercise, follow these tips:
- Start with lighter weights: This is a challenging exercise, so it's important to start with lighter weights until you become comfortable with the movement.
- Focus on proper form: Keep your elbows close to your body during the curl and press and make sure to fully extend your arms during the press.
- Breathe properly: Inhale as you curl the weights up, exhale as you press them overhead, and inhale as you lower them back down.
- Don't rush: Take your time with each repetition and focus on maintaining proper form throughout the exercise.
Conclusion
The curl to press exercise is an excellent way to build strength and muscle in your upper body. By targeting multiple muscle groups at once, this exercise can help you get the most out of your workouts and achieve a more defined and toned appearance. By following the tips outlined in this article, you can perform the curl to press exercise safely and effectively, and start seeing results in no time.
Related video of Curl to Press Exercise: A Complete Guide to Build Strong Arms

The Standing Cable Wood Chop is an effective exercise that targets your upper and lower body, especially your oblique muscles. This exercise is perfect for people who want to tone their abs, shoulders, and back muscles. The Standing Cable Wood Chop workout mimics the motion of chopping wood, which is a functional movement that can benefit your daily activities. In this article, we will discuss the proper technique of performing this exercise, its benefits, and precautions.
How to do Standing Cable Wood Chop?
The Standing Cable Wood Chop is a relatively simple exercise that can be performed by beginners and experts alike. Here are the steps to follow:
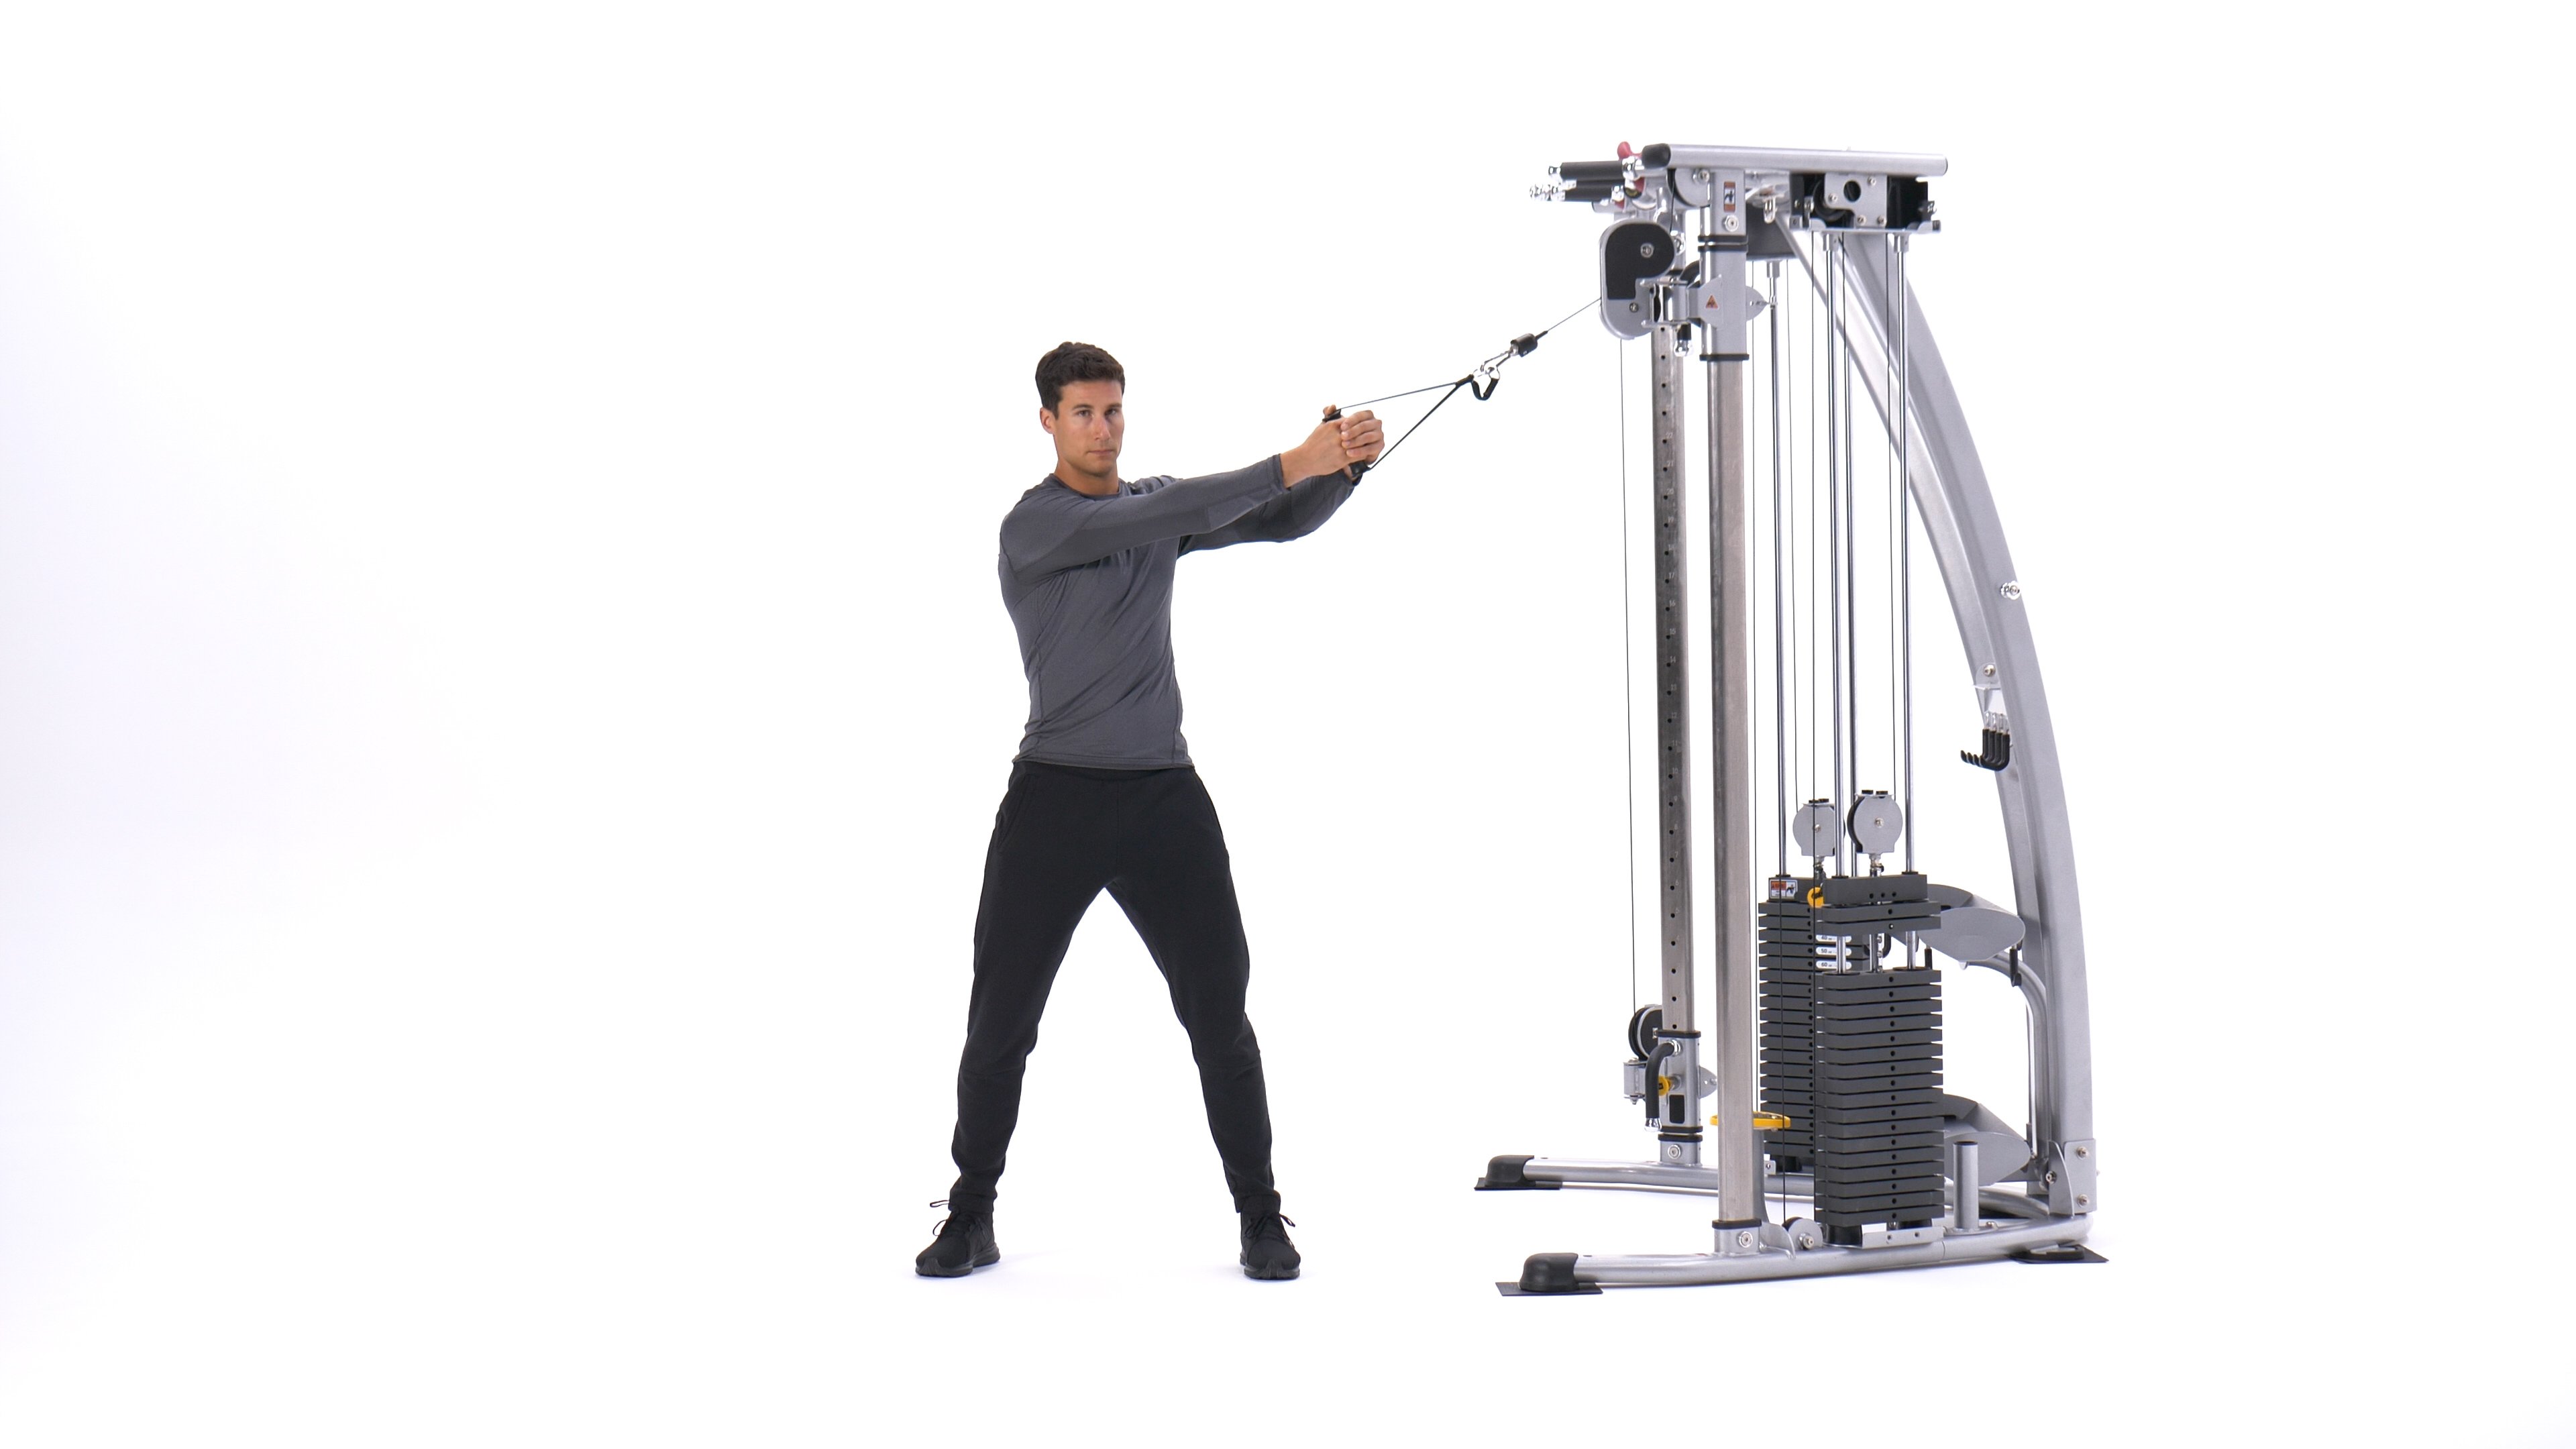
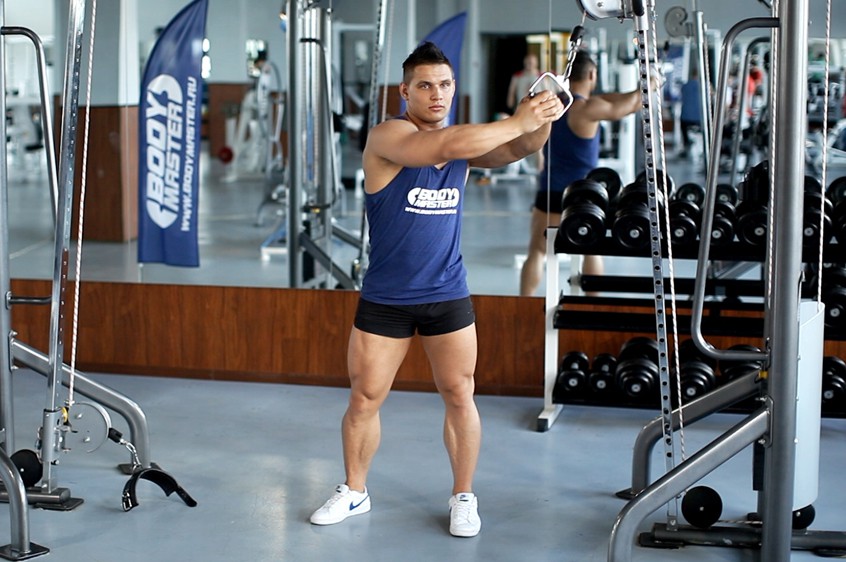
- Stand with your feet shoulder-width apart and your knees slightly bent.
- Hold the cable with both hands and stand perpendicular to the cable machine.
- Extend your arms straight up to the opposite side of the cable machine.
- Bring the cable down and across your body in a diagonal motion towards your opposite hip.
- Engage your core muscles and exhale as you lower the cable.
- Slowly return to the starting position by raising the cable back to the opposite side of the cable machine.
- Repeat this movement for the desired number of repetitions on one side before switching to the other side.
Benefits of Standing Cable Wood Chop
The Standing Cable Wood Chop has numerous benefits that can improve your overall fitness. Here are some of the benefits:
- Targets multiple muscle groups: The Standing Cable Wood Chop targets your abs, shoulders, back, and legs, making it a full-body workout.
- Improves stability and balance: This exercise requires you to engage your core muscles, which can improve your stability and balance.
- Enhances functional movement: The Standing Cable Wood Chop mimics the motion of chopping wood, which is a functional movement that can benefit your daily activities.
- Increases strength: This exercise can increase your strength and endurance, making it easier for you to perform other exercises or activities.
- Great for weight loss: The Standing Cable Wood Chop is a high-intensity exercise that can burn a lot of calories, making it great for weight loss.
Precautions
While the Standing Cable Wood Chop is a safe exercise, there are a few precautions that you should take to avoid injury. Here are some of them:
- Start with a lighter weight: If you are a beginner, start with a lighter weight and gradually increase it as you get stronger.
- Keep your back straight: Avoid arching your back during the exercise to prevent back injuries.
- Use proper form: Make sure that you perform the exercise with proper form to avoid strain on your neck and shoulders.
- Consult your doctor: If you have any medical conditions or injuries, consult your doctor before performing this exercise.

Conclusion
The Standing Cable Wood Chop is an effective exercise that can improve your overall fitness. It targets multiple muscle groups, improves stability and balance, enhances functional movement, increases strength, and is great for weight loss. However, it is important to perform the exercise with proper form and take precautions to avoid injury. Consult your doctor if you have any medical conditions or injuries. Incorporate this exercise into your workout routine and enjoy the benefits it offers!
Related video of Standing Cable Wood Chop: A Comprehensive Guide
When it comes to building a strong and toned back, the close grip seated cable row is one of the most effective exercises you can do. Not only does it target multiple muscle groups in your back, but it also engages your biceps, forearms, and shoulders, making it a great all-around exercise.

What is a Close Grip Seated Cable Row?
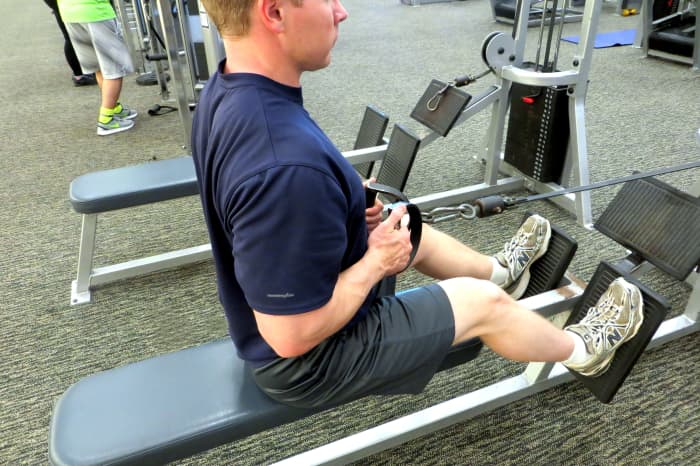
A close grip seated cable row is a strength-training exercise that works the muscles in your upper and middle back. You perform the exercise by sitting on a machine with a cable attached to a weight stack. You then grasp the handle with your hands close together and pull it towards your chest while keeping your back straight.
The close grip seated cable row is a compound exercise, which means it works multiple muscle groups at the same time. The main muscles worked during the exercise are the rhomboids, trapezius, and latissimus dorsi.
How to Perform a Close Grip Seated Cable Row

Here's how to perform a close grip seated cable row:
- Adjust the seat of the machine so that your feet are flat on the ground and your knees are slightly bent.
- Grasp the handle with your palms facing down and your hands close together, about shoulder-width apart.
- Sit up straight with your shoulders back and your chest out.
- Keeping your elbows close to your body, pull the handle towards your chest, squeezing your shoulder blades together as you do so.
- Hold the position for a second or two, then slowly release the handle back to the starting position.
- Repeat for the desired number of reps.
When performing the close grip seated cable row, it's important to maintain proper form throughout the exercise. Keep your back straight and your shoulders back, and avoid using momentum to pull the handle.
Variations of the Close Grip Seated Cable Row
There are several variations of the close grip seated cable row that you can try to target different muscles in your back:
- Wide Grip Seated Cable Row: Instead of holding the handle close together, grasp it with your hands wider apart to target your outer back muscles.
- Reverse Grip Seated Cable Row: Hold the handle with your palms facing up to target your biceps and forearms in addition to your back.
- One Arm Seated Cable Row: Perform the exercise with one arm at a time to emphasize each side of your back individually.
Benefits of the Close Grip Seated Cable Row

Here are some of the benefits of incorporating the close grip seated cable row into your workout routine:
- Strengthens your back muscles: The exercise targets your upper and middle back muscles, helping to build strength and improve posture.
- Engages multiple muscle groups: In addition to your back muscles, the close grip seated cable row also works your biceps, forearms, and shoulders.
- Improves grip strength: Holding onto the handle during the exercise can help improve your grip strength over time.
- Can be adjusted for different fitness levels: You can adjust the weight and number of reps to cater to your fitness level and goals.
Incorporating the Close Grip Seated Cable Row into Your Workout Routine
If you want to incorporate the close grip seated cable row into your workout routine, try doing 3-4 sets of 8-12 reps each time you work out your back muscles. Make sure to rest for 30-60 seconds between sets to allow your muscles to recover.
In addition to the close grip seated cable row, you can also include other exercises that target your back muscles, such as pull-ups, lat pulldowns, and bent-over rows. By incorporating a variety of exercises into your workout routine, you can help prevent boredom and ensure that you're targeting all the muscles in your back.
Conclusion
The close grip seated cable row is a versatile and effective exercise that can help you build a stronger and more toned back. By incorporating it into your workout routine, you can target multiple muscle groups and improve your overall fitness level. So if you're looking to build a stronger back, give the close grip seated cable row a try!
Related video of Close Grip Seated Cable Row: Building a Stronger Back

If you are someone who loves to work out, you must be aware of the importance of different exercises that help in toning and shaping different muscles of the body. One such exercise that is great for working out the muscles of the shoulders is Plate Front Raise. This exercise is great for building strength and definition in the shoulders, and is often used by bodybuilders and fitness enthusiasts alike. In this article, we will discuss the Plate Front Raise Muscles Worked in detail, so you can understand the benefits of this exercise better.
What is Plate Front Raise?

Plate Front Raise is an isolation exercise that targets the anterior deltoid muscles of the shoulders. It involves lifting a weight plate in front of your body, keeping your arms fully extended and parallel to the ground. This exercise can be performed using a weight plate, dumbbells, or any other object with weight.
How to Perform Plate Front Raise?

To perform Plate Front Raise, follow the steps given below:
- Stand tall and hold a weight plate in front of your thighs, with your hands placed on the sides of the plate.
- Keep your arms straight and parallel to the ground.
- Lift the weight plate in front of your body, keeping your arms fully extended.
- Pause for a second and then lower the weight plate to the starting position.
- Repeat the exercise for a desired number of repetitions.
Plate Front Raise Muscles Worked

Plate Front Raise primarily targets the anterior deltoid muscles of the shoulders, which are the front portion of the shoulder muscles. Along with the anterior deltoids, this exercise also works the other muscles of the shoulders, including the lateral deltoids and the rotator cuff muscles. In addition, Plate Front Raise also works the upper chest muscles and the triceps.
Benefits of Plate Front Raise
Plate Front Raise is a great exercise for anyone looking to build strength and definition in the shoulders. Some of the benefits of this exercise are:
- Helps in strengthening the anterior deltoid muscles of the shoulders
- Improves shoulder stability and mobility
- Works the upper chest muscles and the triceps
- Helps in achieving a V-shaped torso
- Improves posture and reduces the risk of shoulder injuries
Precautions and Tips

While performing Plate Front Raise, it is important to keep in mind the following precautions and tips:
- Start with a light weight and gradually increase the weight as you get comfortable with the exercise
- Keep your arms straight and parallel to the ground throughout the exercise
- Avoid swinging the weight plate or using momentum to lift the weight
- Breathe in while lifting the weight plate and breathe out while lowering it
- Avoid lifting the weight plate too high, as it can put unnecessary strain on the shoulder muscles
In Conclusion
Plate Front Raise is a great exercise for anyone looking to build strength and definition in the shoulders. It primarily targets the anterior deltoid muscles of the shoulders, along with other muscles of the shoulders, upper chest muscles, and triceps. It is important to perform this exercise with proper form and technique, and to gradually increase the weight as you get comfortable with the exercise. With regular practice, Plate Front Raise can help in achieving a V-shaped torso, improving posture, and reducing the risk of shoulder injuries.
Related video of Plate Front Raise Muscles Worked
Are you looking for a workout that targets your triceps and helps you achieve those toned arms? Look no further than the cable tricep press down. This exercise is a must-add to your workout routine if you want to strengthen and tone your triceps.

What is the Cable Tricep Press Down?
The cable tricep press down is a resistance exercise that primarily targets the triceps. It is performed using a cable machine, which consists of a weight stack connected to a pulley and a cable. The cable is attached to a handle, which the user holds while performing the exercise.

How to Perform Cable Tricep Press Down?
To perform the cable tricep press down, follow these steps:
- Attach a straight bar or rope to the cable machine.
- Stand facing the cable machine with your feet shoulder-width apart.
- Hold the bar or rope with an overhand grip and keep your elbows close to your sides.
- Extend your arms down towards the floor until your elbows are fully extended.
- Slowly lower the weight back to the starting position.
- Repeat for 10-12 reps for 3-4 sets.

Tips for Proper Form
Proper form is essential when performing the cable tricep press down to avoid injury and maximize results. Here are some tips for proper form:
- Keep your back straight and your core engaged throughout the exercise.
- Don't let your elbows flare out as you extend your arms.
- Use a weight that is challenging but allows you to maintain proper form.
- Focus on contracting your triceps as you extend your arms down.
Variations of the Cable Tricep Press Down
There are several variations of the cable tricep press down that you can try to target different areas of your triceps:
- Rope Tricep Press Down: Use a rope attachment instead of a straight bar for a wider range of motion.
- Reverse Grip Tricep Press Down: Use an underhand grip on the bar to target your lower triceps.
- Single-Arm Tricep Press Down: Perform the exercise with one arm at a time to isolate each tricep.

Benefits of the Cable Tricep Press Down
The cable tricep press down offers several benefits:
- Targets the triceps, which are essential for pushing movements and overall arm strength.
- Can be performed with different variations to target different areas of the triceps.
- Can be easily adjusted for different levels of fitness and strength.
- Helps improve overall arm definition and tone.
Precautions and Contraindications
While the cable tricep press down is generally safe for most people, there are some precautions and contraindications to be aware of:
- Avoid this exercise if you have any shoulder, elbow, or wrist injuries.
- Consult with a doctor or fitness professional before starting a new exercise routine.
- Start with a lighter weight and gradually increase as your strength improves.
- Make sure to use proper form to avoid injury.
Conclusion
The cable tricep press down is an effective exercise for targeting and toning your triceps. With proper form and technique, you can achieve stronger and more defined arms. Remember to start with a lighter weight and gradually increase as your strength improves, and always consult with a doctor or fitness professional before starting a new exercise routine. Incorporate the cable tricep press down into your workout routine and watch your arms transform!
Related video of Cable Tricep Press Down: A Complete Guide

Looking to improve your back muscles? The lat pulldown pronated grip is an excellent exercise for building a strong back. It's a compound exercise that targets your latissimus dorsi, rhomboids, and trapezius muscles. This exercise is commonly performed in the gym and is suitable for beginners and advanced lifters alike. In this article, we'll be taking a closer look at the lat pulldown pronated grip and how to perfect your form.
What is a Lat Pulldown Pronated Grip?
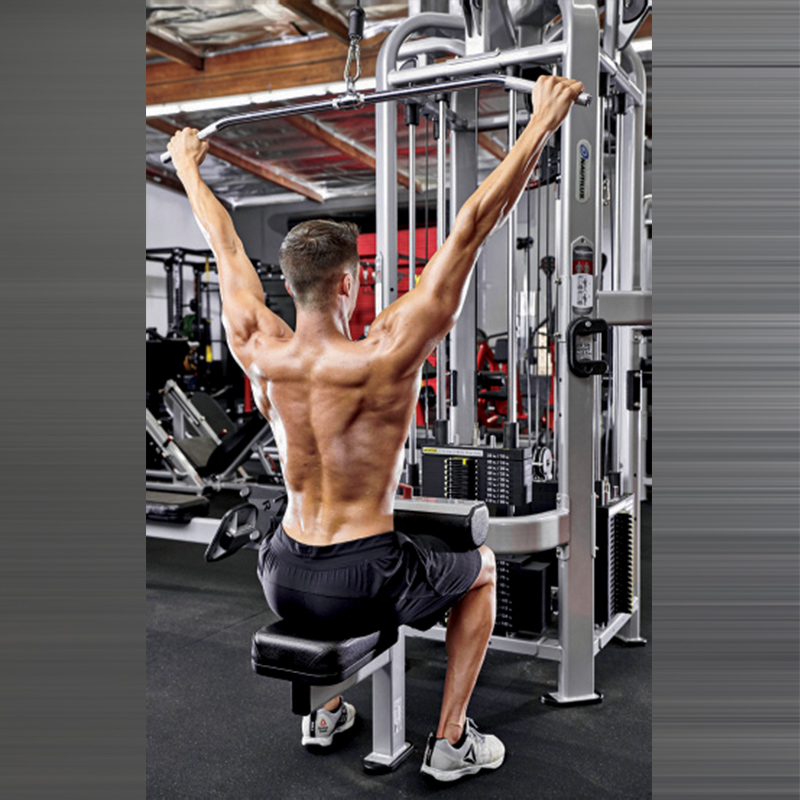
A lat pulldown pronated grip is a variation of the traditional lat pulldown. This exercise involves using a cable machine with a wide grip bar attached to the top of the machine. The grip is pronated, which means that your palms are facing away from your body. The lat pulldown pronated grip is an effective exercise for building upper body strength, specifically targeting the muscles in your back.
How to Perform a Lat Pulldown Pronated Grip

To perform a lat pulldown pronated grip, follow these steps:
- Stand in front of the cable machine and grip the bar with your palms facing away from your body.
- Sit down on the bench and adjust the knee pad to fit snugly against your thighs.
- Lean back slightly and engage your core muscles.
- Pull the bar down towards your chest, keeping your elbows close to your body.
- Pause for a moment and then slowly release the bar back up to the starting position.
- Repeat for the desired number of repetitions.
Tips for Perfecting Your Form

Here are some tips to help you perfect your form:
- Keep your elbows close to your body to better target your back muscles.
- Don't lean back too far as this can put unnecessary strain on your lower back.
- Exhale as you pull the bar down towards your chest and inhale as you release it back up.
- Use a weight that challenges you but is still manageable. You should be able to perform the exercise with proper form.
- Don't forget to warm up before performing the exercise to prevent injury.
Variations of the Lat Pulldown Pronated Grip
There are several variations of the lat pulldown pronated grip that you can try to switch up your routine and target different muscles. Here are a few examples:
- Close-Grip Lat Pulldown: This variation involves using a close-grip handle attached to the cable machine. This exercise targets your middle back muscles.
- Reverse-Grip Lat Pulldown: This variation involves using a reverse grip, with your palms facing towards your body. This exercise targets your biceps and upper back muscles.
- Behind-the-Neck Lat Pulldown: This variation involves pulling the bar down behind your neck. This exercise targets your rear deltoids and upper back muscles.
Conclusion
The lat pulldown pronated grip is an excellent exercise for building a strong back. By following the tips outlined in this article and perfecting your form, you can effectively target your back muscles and see results. Remember to start with a weight that challenges you but is still manageable and to warm up before performing the exercise. Incorporate variations of the exercise into your routine to switch things up and target different muscles. With time and dedication, you'll be well on your way to a stronger, more defined back.
Related video of Lat Pulldown Pronated Grip: The Ultimate Guide to Perfecting Your Form
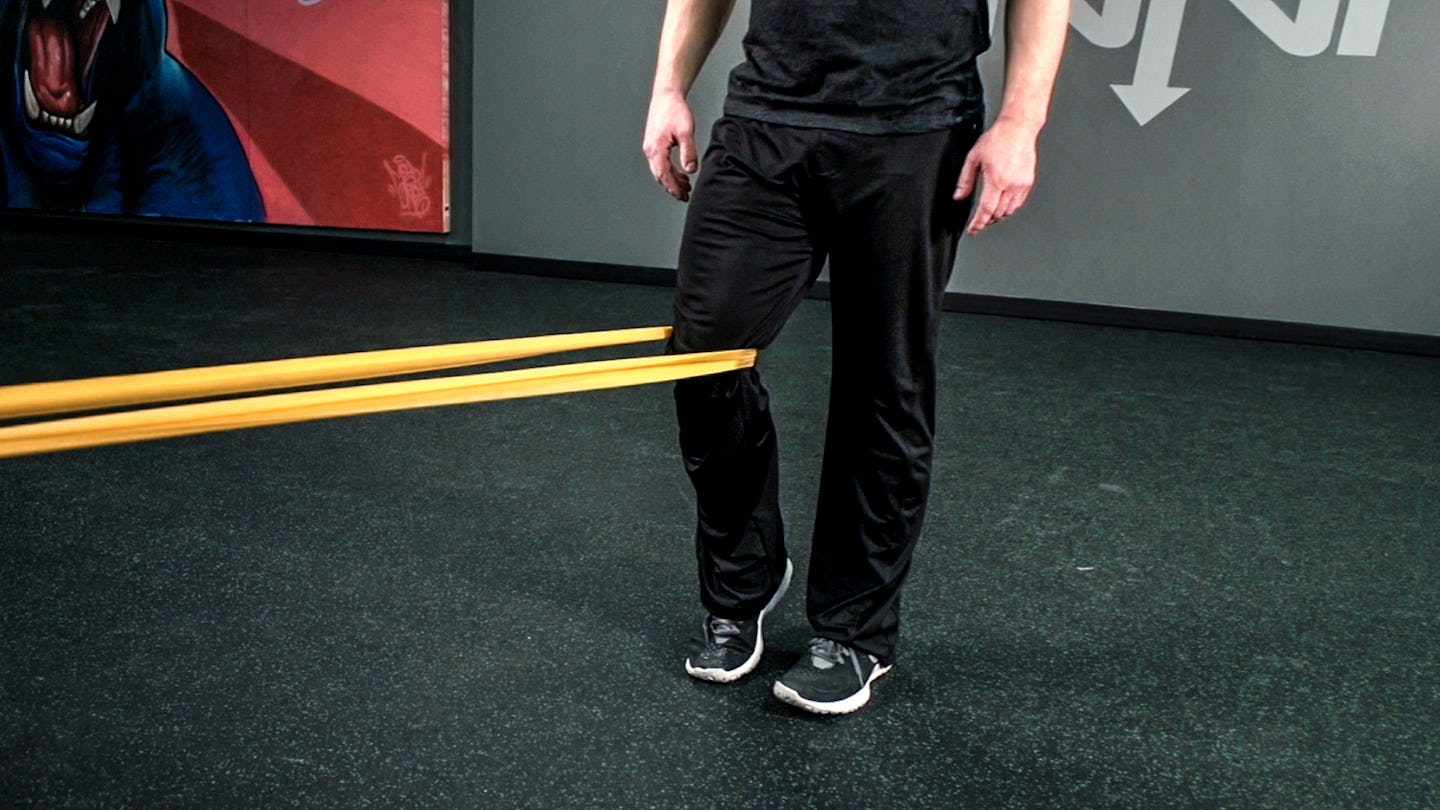
If you're looking for ways to strengthen your knees and prevent injuries, resistance band knee exercises can be a great option. Resistance bands are affordable, portable, and versatile tools that can help you build strength and stability in your lower body.
Why Knee Exercises are Important

The knees are one of the most important joints in the body, and they play a crucial role in many everyday activities, such as walking, running, jumping, and climbing stairs. However, they are also vulnerable to injury and wear and tear, especially as we age or engage in high-impact sports or activities.
By doing knee exercises regularly, you can:
- Strengthen the muscles around the knee joint, such as the quadriceps, hamstrings, and glutes, which can improve your balance, stability, and range of motion.
- Reduce the risk of knee injuries, such as sprains, strains, and tears, by improving the strength and flexibility of the knee joint.
- Relieve knee pain and discomfort caused by conditions such as arthritis, patellofemoral pain syndrome, and IT band syndrome.
The Benefits of Resistance Band Knee Exercises

Resistance band knee exercises offer several advantages over traditional weightlifting or bodyweight exercises, including:
- Low impact: Resistance bands provide a low-impact option for knee exercises, which is ideal for people with knee pain, injuries, or mobility issues.
- Versatility: Resistance bands come in different sizes, strengths, and styles, which allow you to adjust the resistance level and target different muscles and movements.
- Convenience: Resistance bands are lightweight, portable, and easy to store, which makes them a convenient option for home workouts or travel.
- Cost-effective: Resistance bands are an affordable alternative to expensive gym equipment or personal training sessions.
Resistance Band Knee Exercises for Beginners

If you're new to resistance band knee exercises, here are some simple workouts to get you started:
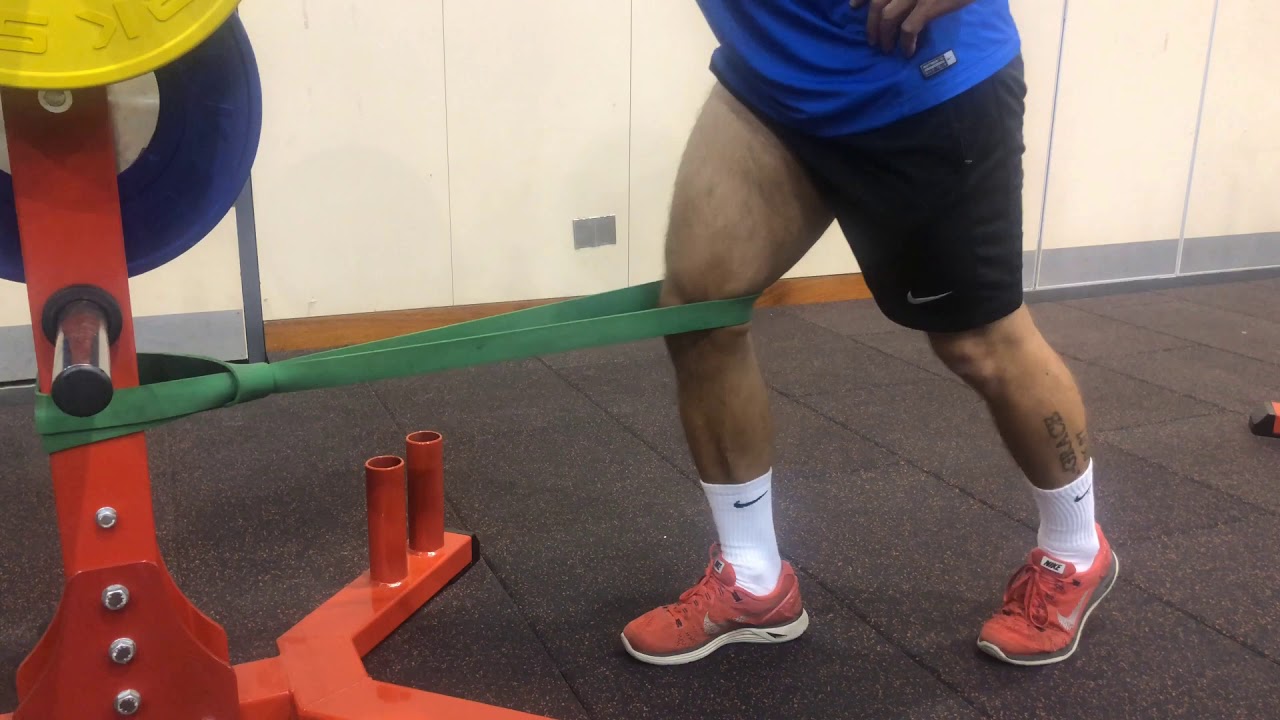
- Side steps: Place the resistance band around your ankles and stand with your feet shoulder-width apart. Keeping your knees slightly bent and your core engaged, take a step to the side with your right foot and then bring your left foot to meet it. Repeat for 10-12 reps, then switch sides.
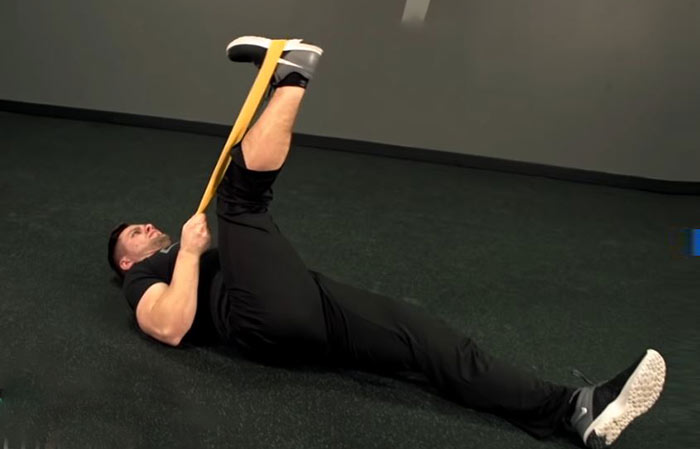
- Leg curls: Lie on your stomach with the resistance band around your ankles. Bend your right knee and lift your heel towards your buttocks, then lower it back down. Repeat for 10-12 reps, then switch sides.
- Wall sits: Place the resistance band around your thighs and stand with your back against a wall. Slide down until your knees are at a 90-degree angle and your thighs are parallel to the floor. Hold for 30-60 seconds, then stand up and rest for 10-15 seconds. Repeat for 3-4 sets.
Intermediate Resistance Band Knee Exercises
If you're ready for a challenge, try these intermediate resistance band knee exercises:
- Lateral band walks: Place the resistance band around your ankles and take a few side steps to create tension. Keeping your core engaged and your knees slightly bent, take a step to the right with your right foot and then bring your left foot to meet it. Repeat for 10-12 reps, then switch sides.
- Single-leg deadlifts: Stand on your left foot with the resistance band under your right foot. Hold the other end of the band with your right hand. Hinge forward at the hips and lift your right leg behind you, keeping your back straight and your core engaged. Lower your leg and repeat for 10-12 reps, then switch sides.
- Clamshells: Lie on your side with the resistance band around your thighs, just above your knees. Bend your knees and stack them on top of each other, then lift your top knee while keeping your feet together. Lower your knee and repeat for 10-12 reps, then switch sides.
Advanced Resistance Band Knee Exercises
If you're an experienced athlete or fitness enthusiast, these advanced resistance band knee exercises can take your training to the next level:
- Band-resisted jump squats: Place the resistance band around your thighs and stand with your feet shoulder-width apart. Squat down until your knees are at a 90-degree angle, then explode upwards into a jump. Land softly and repeat for 10-12 reps.
- Pistol squats: Stand on your left foot with the resistance band under your right foot. Hold the other end of the band with your left hand. Lower yourself into a one-legged squat while keeping your back straight and your core engaged. Push back up and repeat for 10-12 reps, then switch sides.
- Single-leg glute bridges: Lie on your back with the resistance band around your thighs, just above your knees. Bend your left knee and place your left foot on the ground, then lift your right leg straight up. Push through your left foot and lift your hips off the ground, squeezing your glutes at the top. Lower your hips and repeat for 10-12 reps, then switch sides.
Conclusion
Resistance band knee exercises are a safe, effective, and convenient way to improve your knee strength, stability, and mobility. Whether you're a beginner or an advanced athlete, there's a resistance band knee exercise for you. Start with the basic workouts and gradually increase the intensity and complexity as you get stronger and more confident. With regular practice, you can enjoy healthier, happier knees for years to come.
Related video of Resistance Band Knee Exercises: Strengthen Your Knees with These Simple Workouts

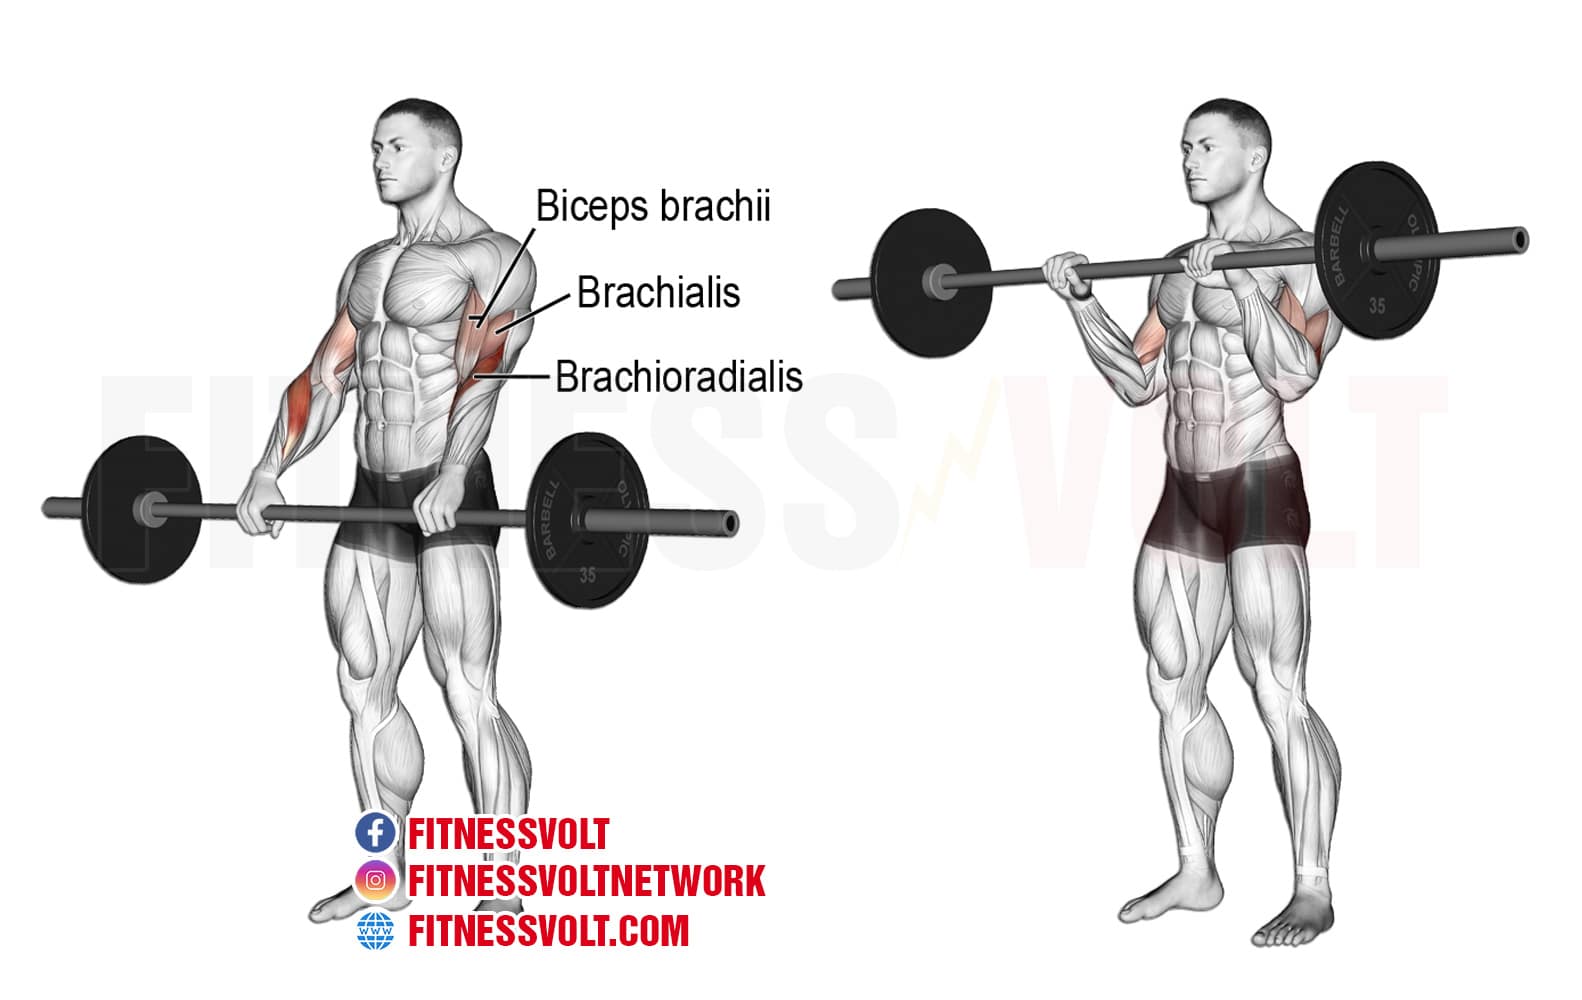
If you are looking for an effective exercise to build stronger and bigger biceps, then the reverse grip bicep curl is definitely worth trying. This exercise targets the biceps brachii muscle, which is the primary muscle responsible for flexing the elbow joint and lifting objects towards the body. By performing this exercise regularly, you can increase the size and strength of your biceps, making them more defined and prominent.
What is a Reverse Grip Bicep Curl?

The reverse grip bicep curl is a variation of the traditional bicep curl that involves holding the dumbbell or barbell with an underhand grip instead of an overhand grip. This grip change shifts the emphasis of the exercise from the long head of the biceps to the short head, which results in greater activation of the biceps muscles.
How to Perform a Reverse Grip Bicep Curl

To perform a reverse grip bicep curl, follow these steps:
- Stand with your feet shoulder-width apart, holding a dumbbell or barbell with an underhand grip.
- Keep your elbows close to your sides and your palms facing up.
- Curl the weight towards your chest, keeping your elbows stationary and your upper arms locked in place.
- Pause at the top of the movement and squeeze your biceps.
- Slowly lower the weight back down to the starting position.
- Repeat for the desired number of repetitions.
Benefits of Reverse Grip Bicep Curl

There are several benefits of performing reverse grip bicep curls:
- Increased bicep activation: The reverse grip shifts the emphasis to the short head of the biceps, resulting in greater activation and growth of the biceps muscles.
- Improved grip strength: The underhand grip challenges your grip strength, which can help improve your overall upper body strength.
- Reduced risk of injury: The reverse grip places less stress on the wrists and forearms, reducing the risk of injury compared to traditional bicep curls.
- Variation in workout: Adding reverse grip bicep curls to your workout routine can add variety and challenge your muscles in a different way.
Common Mistakes to Avoid
When performing reverse grip bicep curls, it's important to avoid these common mistakes:
- Swinging the weights: Momentum is your enemy when it comes to building muscle. Swinging the weights can take the stress off the biceps and reduce the effectiveness of the exercise.
- Using too much weight: Using too much weight can also compromise your form and lead to injury. Start with a lighter weight and gradually increase as you become stronger.
- Not squeezing at the top: Squeezing your biceps at the top of the movement helps to fully engage the muscle and promote growth.
- Not fully extending at the bottom: Make sure to fully extend your arms at the bottom of the movement to get the most out of each repetition.
Conclusion
The reverse grip bicep curl is a highly effective exercise for building stronger and bigger biceps. By following proper form and avoiding common mistakes, you can maximize the benefits of this exercise and achieve your fitness goals.
Related video of Reverse Grip Bicep Curl - The Ultimate Guide to Building Stronger and Bigger Biceps
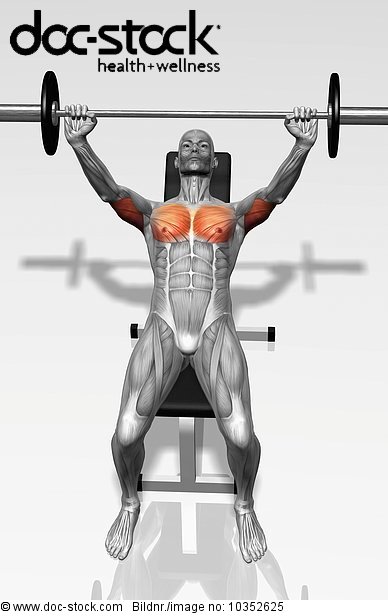
The incline bench press is a popular exercise among athletes and fitness enthusiasts. It is a variation of the traditional bench press, where the bench is inclined at an angle of around 45 degrees. This exercise primarily targets the upper body muscles, particularly the chest, shoulders, and triceps. In this article, we will discuss the muscles worked by the incline bench press.
Chest Muscles

The incline bench press is an excellent exercise to target the chest muscles. The chest muscles, also known as pectorals, consist of two main muscles: the pectoralis major and the pectoralis minor. The pectoralis major is the larger of the two muscles, and it is responsible for the movement of the arms across the chest. The incline bench press targets the upper section of the pectoralis major, which is the clavicular head. This muscle is responsible for the movement of the arms towards the body's midline.
Shoulder Muscles

The incline bench press also targets the shoulder muscles, particularly the anterior deltoid. The anterior deltoid is the front section of the shoulder, and it is responsible for the movement of the arms away from the body's midline. The incline bench press targets this muscle by placing the arms in an inclined position, which puts more emphasis on the front shoulder muscles.
Triceps Muscles
The triceps muscles are located at the back of the upper arm, and they are responsible for extending the arm. The incline bench press targets the long head of the triceps muscle, which is the largest of the three heads. This muscle is responsible for the extension of the arm towards the body's midline.
Other Muscles Worked by Incline Bench Press

In addition to the chest, shoulder, and triceps muscles, the incline bench press also works other muscles, including the biceps, forearms, and upper back muscles. The biceps muscles are located at the front of the upper arm and are responsible for flexing the arm. The forearms muscles are responsible for wrist and hand movements, while the upper back muscles are responsible for supporting the shoulder blades and maintaining proper posture during the exercise.
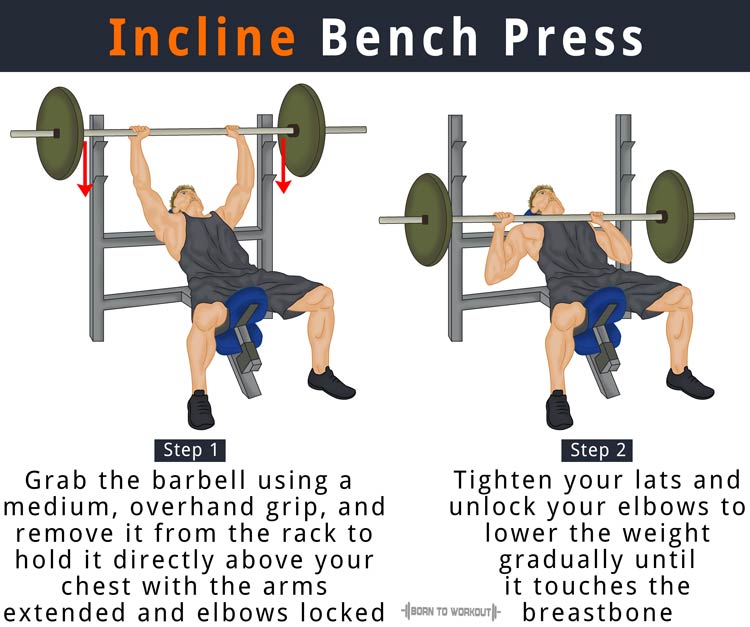
How to Perform Incline Bench Press

To perform the incline bench press, follow these steps:
- Lie down on an incline bench, with your feet planted firmly on the ground.
- Grasp the bar with an overhand grip, slightly wider than shoulder-width apart.
- Lower the bar to your chest, keeping your elbows tucked in and your shoulders back.
- Push the bar back up, extending your arms fully.
Conclusion
The incline bench press is an effective exercise to target the upper body muscles, particularly the chest, shoulders, and triceps. In addition to these muscles, it also works the biceps, forearms, and upper back muscles. To perform this exercise correctly, it is essential to maintain proper form and technique. Incorporating the incline bench press into your workout routine can help you build a stronger and more defined upper body.