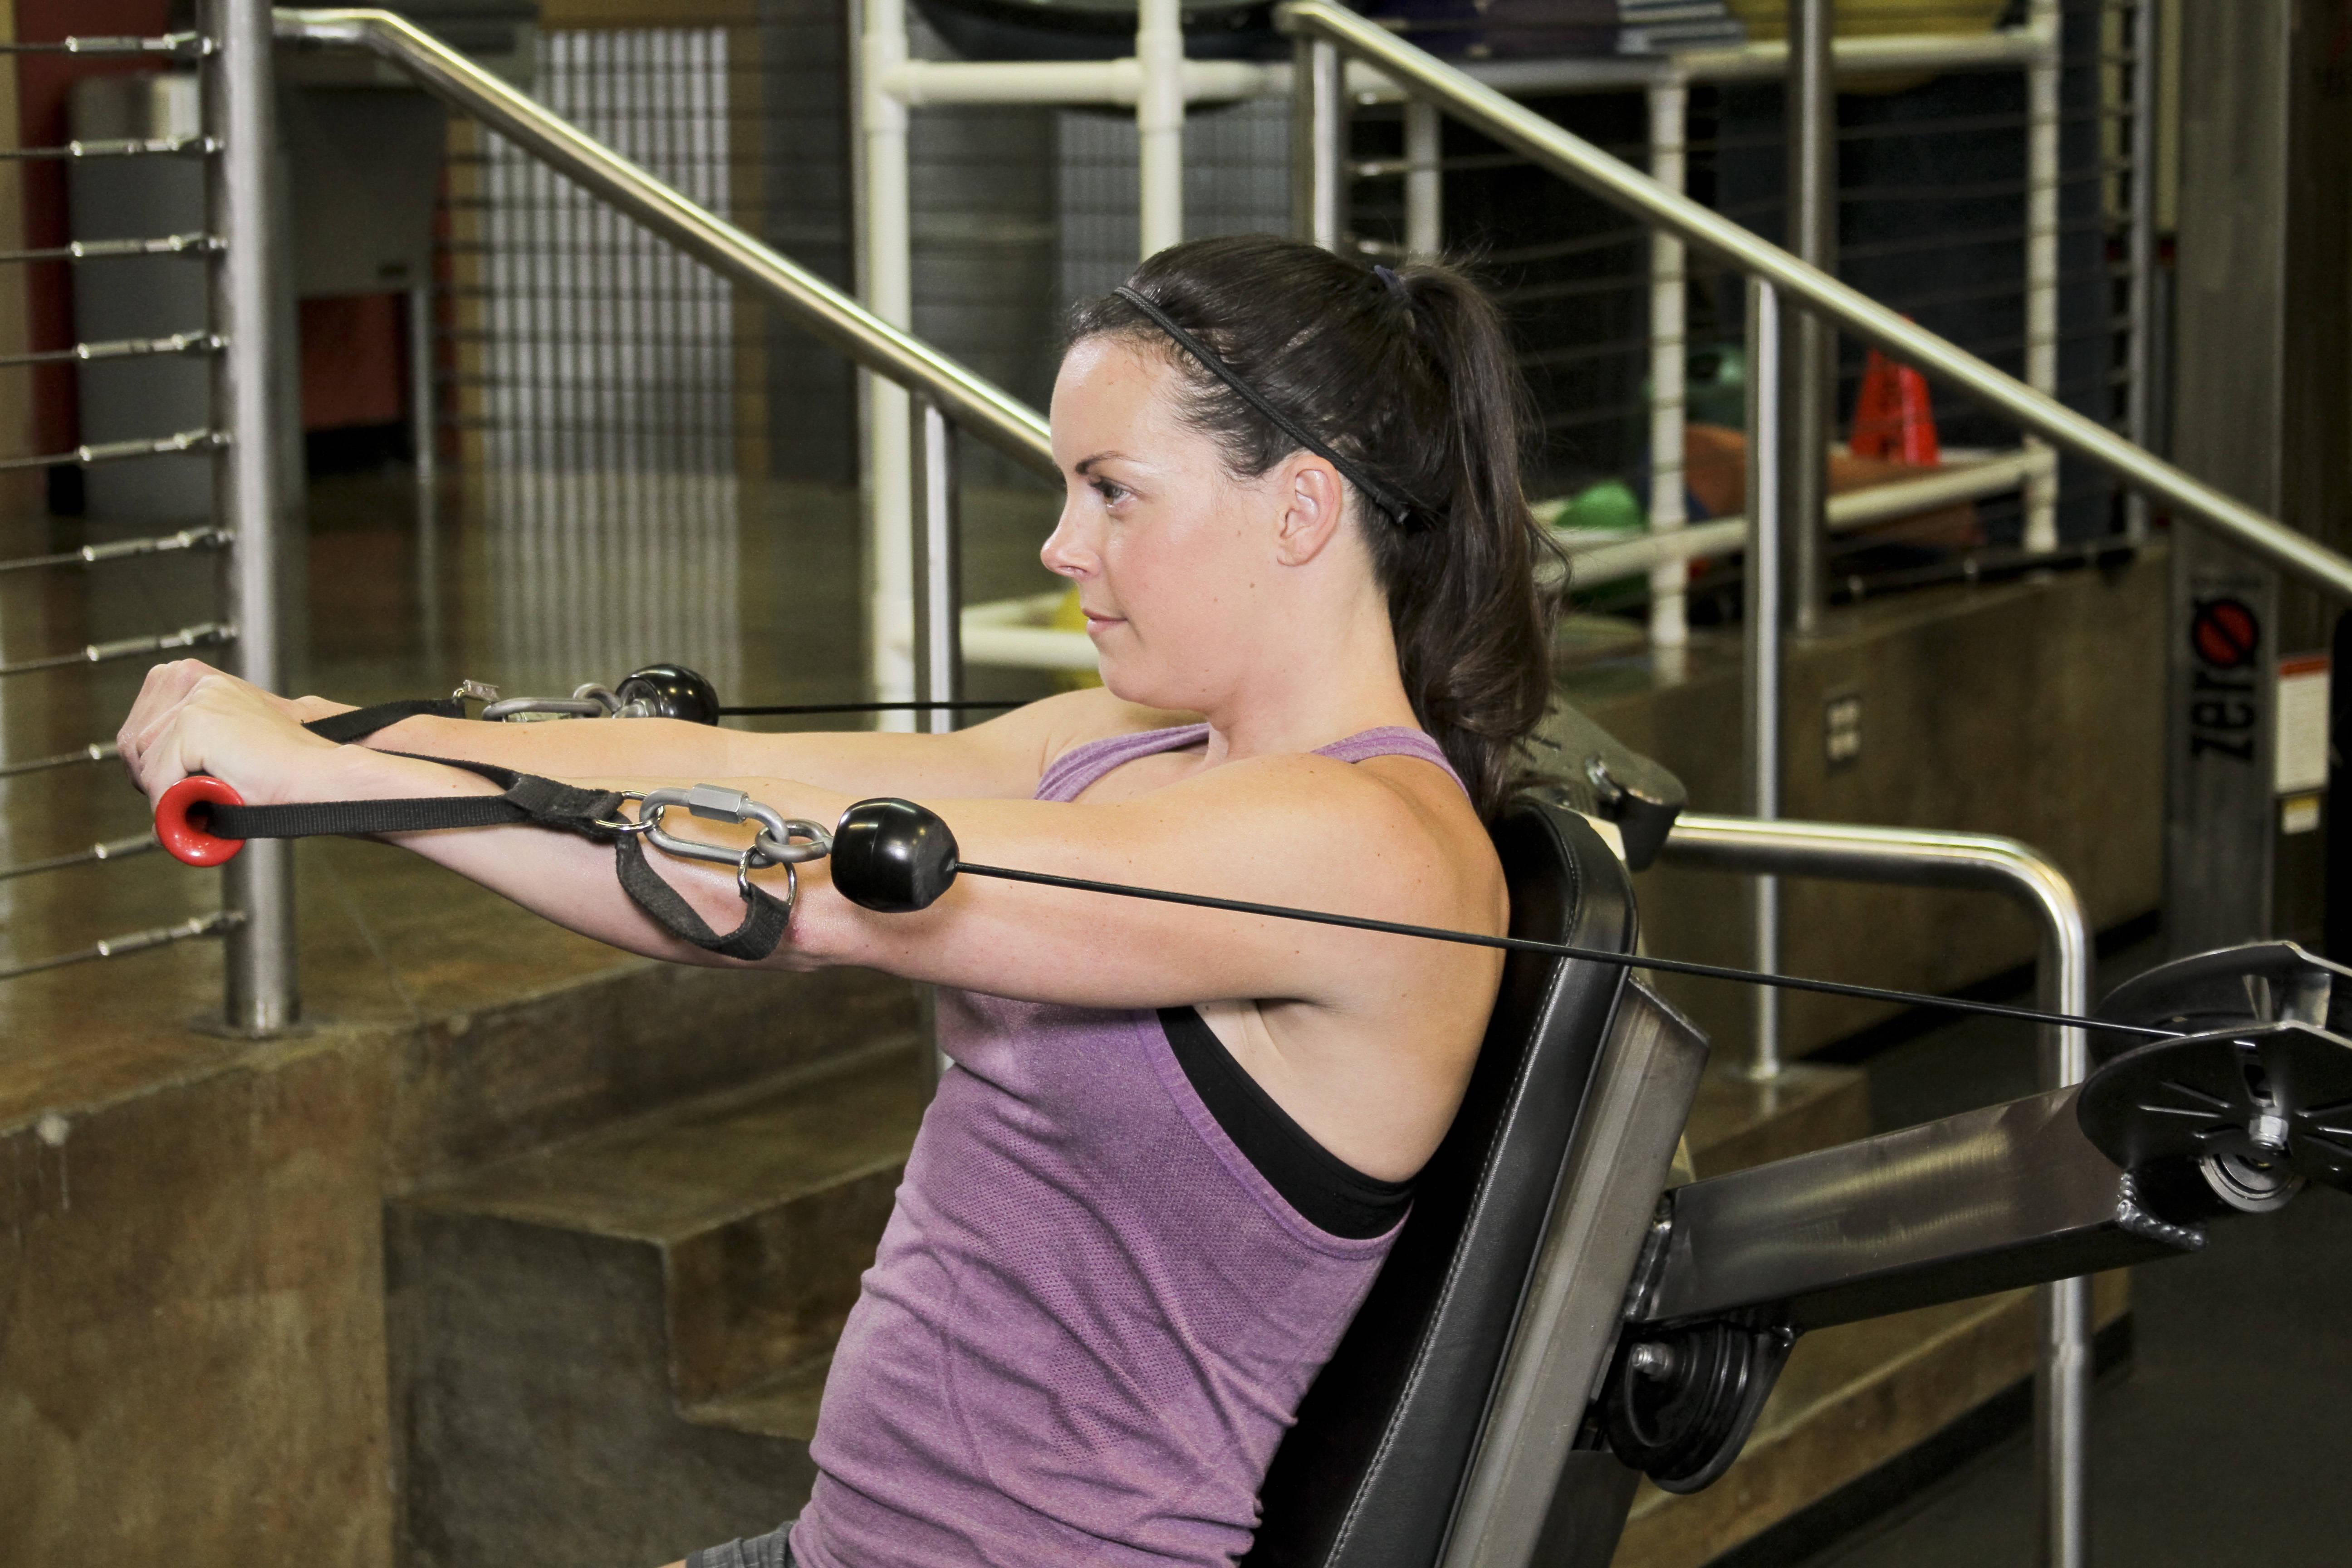
The chest press is a popular exercise that targets the chest muscles. It is usually performed using dumbbells, barbells or machines. However, today we're going to talk about chest press with cables.
What is Chest Press With Cables?
Chest press with cables is an exercise that utilizes cable machines to target the chest muscles. It involves pushing cables away from the body while keeping the arms extended. This exercise is great for building upper body strength and improving posture.

How to do Chest Press With Cables?
Here's how you can perform chest press with cables:
- Stand in front of the cable machine and hold the handles at shoulder height with your palms facing down.
- Step forward to create tension on the cables.
- Brace your core and keep your back straight.
- Push the cables away from your body while keeping your arms extended.
- Pause for a second and then slowly release the cables back to the starting position.
- Repeat for the desired number of reps.

Benefits of Chest Press With Cables
Chest press with cables has several benefits:
- Targets the chest muscles effectively.
- Improves upper body strength and posture.
- Allows for better range of motion compared to traditional chest press exercises.
- Engages the core muscles for stability.
- Reduces the risk of injury by providing constant tension throughout the movement.

Variations of Chest Press With Cables
Here are some variations of chest press with cables:
- Incline chest press with cables
- Decline chest press with cables
- Single arm chest press with cables
- Reverse grip chest press with cables

Precautions to Take
Here are some precautions you should take before doing chest press with cables:
- Consult your doctor before starting any new exercise program, especially if you have any medical conditions or injuries.
- Warm up properly before starting the exercise to prevent injury.
- Start with lighter weights and gradually increase the weight as you get stronger.
- Engage your core muscles to maintain stability throughout the movement.
- Avoid locking your elbows at the end of the movement to prevent injury.

Conclusion
Chest press with cables is a great exercise for building upper body strength and improving posture. It targets the chest muscles effectively and allows for better range of motion compared to traditional chest press exercises. However, it's important to take the necessary precautions to prevent injury. Consult your doctor before starting any new exercise program and start with lighter weights before gradually increasing the weight.
Related video of Chest Press With Cables: A Complete Guide
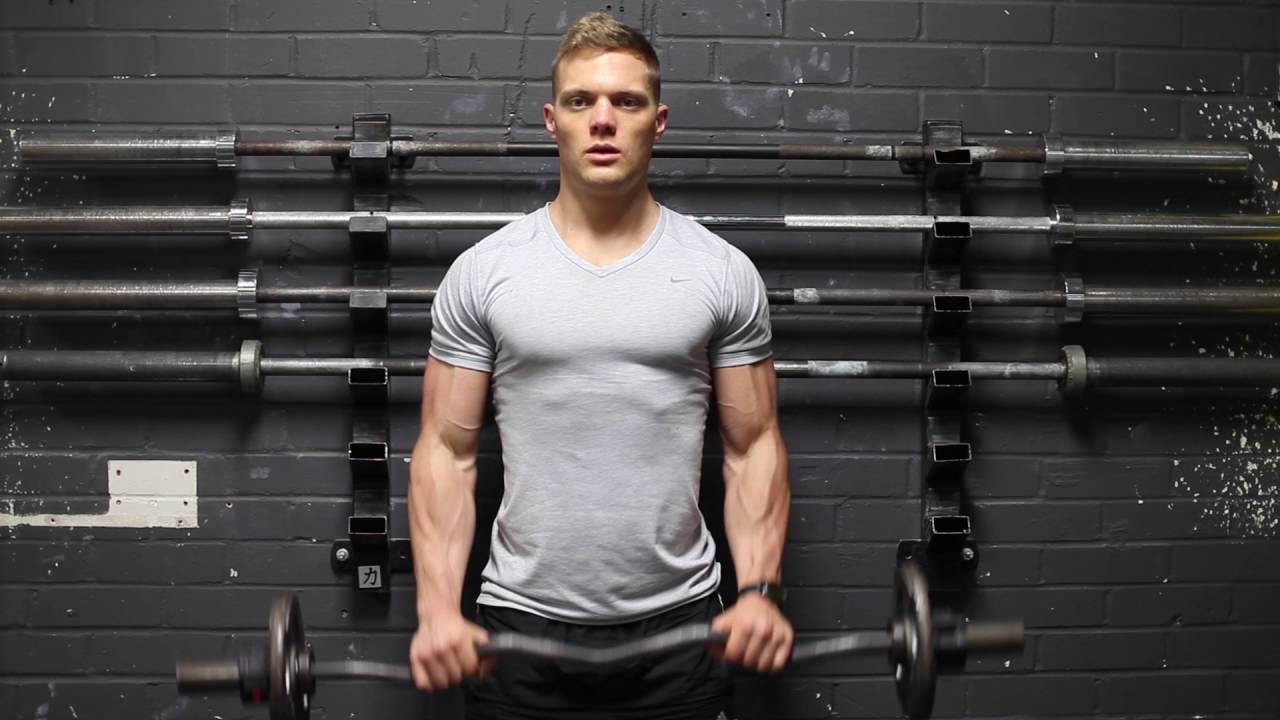
Are you tired of doing the same old bicep curls every day? If so, it's time to switch up your routine and try the ez bar reverse grip curl. This exercise is a variation of the traditional bicep curl that targets the brachialis muscle, which is located underneath the bicep muscle. In this article, we'll discuss everything you need to know about the ez bar reverse grip curl, including how to perform it, its benefits, and some tips for maximizing your results.
What is the Ez Bar Reverse Grip Curl?
The ez bar reverse grip curl is a bicep exercise that involves holding the ez bar with an underhand grip and curling it towards your chest. Unlike traditional bicep curls, which primarily work the bicep muscle, the ez bar reverse grip curl targets the brachialis muscle, which is located underneath the bicep muscle. This muscle is important for overall arm strength and can also help improve your grip strength.

How to Perform the Ez Bar Reverse Grip Curl
To perform the ez bar reverse grip curl, follow these steps:
- Stand with your feet shoulder-width apart and grasp the ez bar with an underhand grip.
- Hold the bar with your hands shoulder-width apart and your palms facing up.
- Slowly curl the bar towards your chest, keeping your elbows close to your body.
- Hold the contraction for a few seconds, then slowly lower the bar back down to the starting position.
- Repeat for the desired number of reps.
It's important to keep your elbows close to your body throughout the movement to ensure that you're targeting the brachialis muscle. Additionally, make sure that you're using a weight that allows you to perform the exercise with proper form.

Benefits of the Ez Bar Reverse Grip Curl
There are several benefits to incorporating the ez bar reverse grip curl into your workout routine:
- Targets the Brachialis Muscle: As mentioned, this exercise specifically targets the brachialis muscle, which is important for overall arm strength and can help improve your grip strength.
- Variation: If you're tired of doing traditional bicep curls, the ez bar reverse grip curl is a great variation that can help keep your workouts interesting and challenging.
- Less Strain on the Wrists: The underhand grip used in this exercise puts less strain on your wrists than the overhand grip used in traditional bicep curls.
Tips for Maximizing Your Results
To get the most out of your ez bar reverse grip curls, keep these tips in mind:
- Focus on Form: Proper form is essential for targeting the brachialis muscle and avoiding injury. Make sure that you're keeping your elbows close to your body throughout the movement and using a weight that allows you to perform the exercise with good form.
- Incorporate Variation: While the ez bar reverse grip curl is a great exercise, it's important to incorporate other bicep exercises into your routine to ensure that you're targeting all aspects of the muscle.
- Progressive Overload: To continue seeing results, it's important to gradually increase the weight you're using over time.
Conclusion
The ez bar reverse grip curl is a great exercise for targeting the brachialis muscle and adding variety to your bicep workouts. By following proper form and incorporating progressive overload, you can maximize your results and continue to see improvements in your arm strength and grip strength.
Related video of Ez Bar Reverse Grip Curl: The Ultimate Guide to Building Strong Biceps
If you're looking to improve your flexibility, one of the best places to start is with your toe touch. This simple exercise can help you stretch your hamstrings, increase your range of motion, and improve your overall athletic performance. In this article, we'll explore some tips and techniques that can help you improve your toe touch.
1. Warm up properly

Before you start stretching, it's important to warm up your muscles. This can be as simple as taking a short walk, doing some jumping jacks, or performing a few dynamic stretches. By getting your blood flowing and your muscles warmed up, you'll be better prepared for the stretches ahead.
2. Focus on your breathing

As you stretch, try to focus on your breathing. Inhale deeply as you reach forward, and exhale as you stretch. This can help you relax and get deeper into the stretch.
3. Use proper form

When performing a toe touch, it's important to use proper form. Start by standing up straight with your feet shoulder-width apart. Then, hinge forward at the hips, keeping your back straight and your knees slightly bent. Reach down towards your toes, going as far as you can without straining.
4. Don't force it

Remember, stretching should never be painful. If you feel discomfort or strain, back off and try again later. You'll make progress over time, so be patient and don't force it.
5. Incorporate other stretches

In addition to the toe touch, there are many other stretches that can help improve your flexibility. Some good options include lunges, hip flexor stretches, and calf stretches. Mix and match these stretches to create a well-rounded stretching routine.
6. Stretch regularly

Improving your flexibility takes time and consistency. Try to stretch at least a few times a week, and make sure to include a variety of stretches. Over time, you'll notice that your toe touch (and overall flexibility) will improve.
7. Use props

If you're having trouble getting deeper into your toe touch, consider using props like yoga blocks or a chair. These tools can help you get into the proper form without straining.
8. Be mindful of injuries

If you have a history of physical injuries or chronic pain, be mindful when stretching. Always listen to your body, and avoid any stretches that cause pain or discomfort.
9. Stay hydrated

Drinking enough water is essential for flexibility and overall health. Make sure to stay hydrated before, during, and after your stretching routine.
10. Gradually increase intensity

As you get more comfortable with your toe touch, gradually increase the intensity of your stretches. Reach a little further each time, and hold the stretch for a few seconds longer. This will help you continue making progress over time.
11. Practice mindfulness

Stretching can be a great way to practice mindfulness. Focus on the sensations in your body as you stretch, and try to clear your mind of distractions.
12. Use visualization techniques

Visualizing yourself successfully performing the toe touch can be a powerful way to improve your flexibility. Try to picture yourself stretching deeper and deeper with each repetition.
13. Don't neglect strength training

While stretching is important for flexibility, don't neglect strength training. Building strength in your legs, core, and back can help you perform the toe touch (and other stretches) with more ease.
14. Listen to your body
Finally, always listen to your body when stretching. If something doesn't feel right, stop and reassess. Remember, stretching should be a gentle and relaxing activity that leaves you feeling refreshed and rejuvenated.
Conclusion
Improving your toe touch is a great way to increase your flexibility and overall physical performance. By following these tips and techniques, you can make progress over time and enjoy the many benefits of a more limber body.
Related video of How To Improve Toe Touch
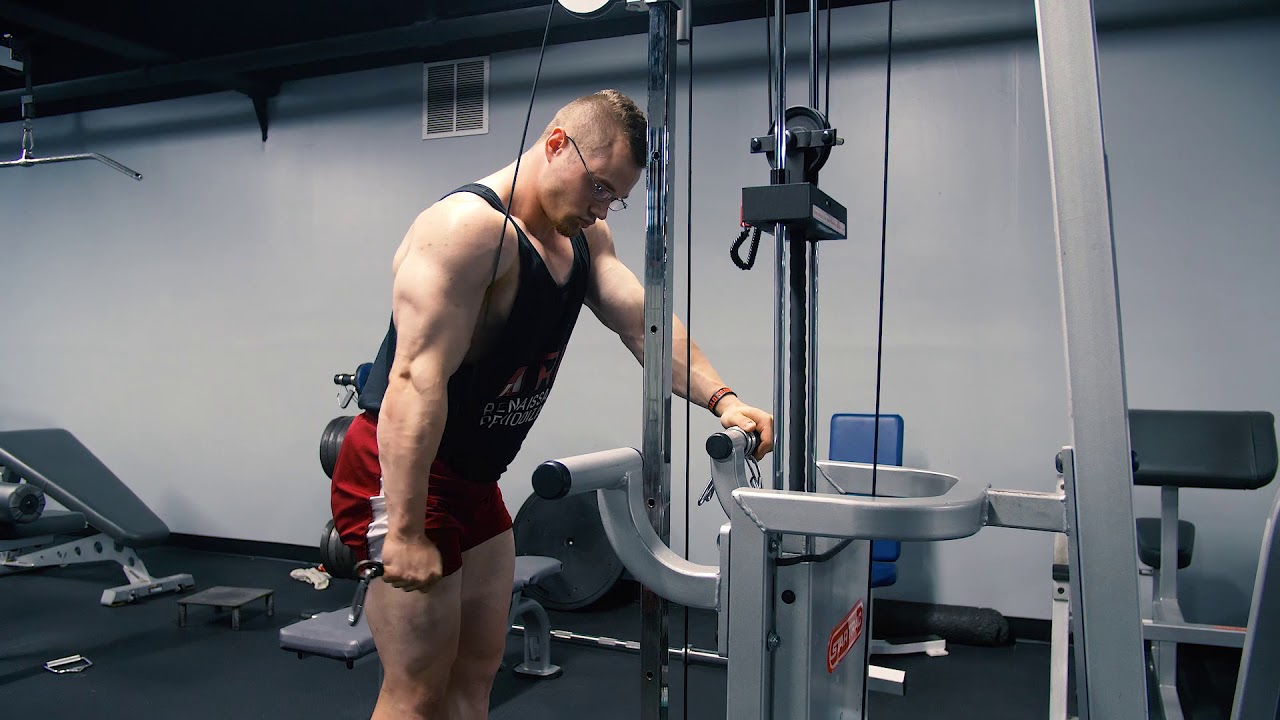
The triceps brachii is a three-headed muscle located at the back of the upper arm. It plays a vital role in arm extension and is essential for various activities such as pushing, pulling, and lifting. A well-developed triceps not only enhances the overall appearance of the arms but also improves strength and performance.
What is Single Arm Cable Pushdown?

Single Arm Cable Pushdown is a popular exercise that targets the triceps. It is performed using a cable machine with a single handle attachment. The exercise involves extending the arm downwards against resistance, thereby isolating and contracting the triceps muscle.
How to Perform Single Arm Cable Pushdown?
Follow these steps to perform Single Arm Cable Pushdown:
- Attach a single handle to the high pulley of a cable machine.
- Hold the handle with an overhand grip and stand facing the machine.
- Keep your elbow close to your body, and your upper arm stationary throughout the exercise.
- Extend your arm downwards until it is fully extended.
- Hold for a second, then slowly return to the starting position.
- Repeat for the desired number of repetitions, then switch arms.
Benefits of Single Arm Cable Pushdown

Single Arm Cable Pushdown offers several benefits, including:
- Isolates and targets the triceps muscle effectively.
- Improves triceps strength and size.
- Reduces the risk of injury by strengthening the elbow joint.
- Improves overall arm definition and aesthetics.
- Can be performed with a variety of cable attachments for variation.
Common Mistakes to Avoid
Here are some common mistakes to avoid while performing Single Arm Cable Pushdown:
- Using too much weight and compromising form.
- Moving the upper arm during the exercise, which reduces the effectiveness of the exercise.
- Not fully extending the arm downwards, which reduces the range of motion.
- Not controlling the weight during the eccentric (lowering) phase of the movement.
- Not using a full range of motion by stopping short of complete extension.
Single Arm Cable Pushdown Variations

Here are some variations of Single Arm Cable Pushdown:
- Reverse Grip Single Arm Cable Pushdown: Perform the exercise with an underhand grip for variation.
- V-Bar Single Arm Cable Pushdown: Use a V-bar attachment for a different grip and range of motion.
- Rope Single Arm Cable Pushdown: Use a rope attachment for a different grip and range of motion.
- Single Arm Cable Overhead Extension: Perform the exercise with the handle attached to a low pulley and extending your arm overhead.
Conclusion
Single Arm Cable Pushdown is a simple yet effective exercise for building triceps strength and size. By following proper form and avoiding common mistakes, you can maximize the benefits of this exercise. Incorporate Single Arm Cable Pushdown into your triceps workout routine for improved arm aesthetics and performance.
Related video of Single Arm Cable Pushdown: An Effective Way to Build Triceps

Lateral raises on cable machine is an effective exercise for building shoulder muscles. This exercise targets the medial deltoid, which is the middle part of the shoulder muscle. By doing this exercise, you can strengthen your shoulder muscles, improve your posture, and reduce the risk of shoulder injuries.
How to do Lateral Raises on Cable Machine
Here are the steps to do lateral raises on cable machine:
- Stand facing the cable machine and adjust the pulley to the lowest setting.
- Hold the handle with your left hand and stand with your feet shoulder-width apart for stability.
- Keep your back straight, core engaged, and your left arm straight down by your side.
- Slowly raise your arm to the side until it reaches shoulder level.
- Hold the position for a few seconds and then slowly lower your arm back down to the starting position.
- Repeat for the desired number of reps and then switch arms.
Tips for Doing Lateral Raises on Cable Machine
Here are some tips for doing lateral raises on cable machine:
- Start with a lighter weight and gradually increase as you get stronger.
- Keep your elbow slightly bent throughout the exercise to reduce stress on your shoulder joint.
- Focus on using your shoulder muscle to lift the weight, rather than using momentum or swinging your arm.
- Exhale as you lift the weight and inhale as you lower it.
- Don't lift the weight higher than shoulder level as it can cause shoulder impingement.
- Keep your core engaged and avoid arching your back.
Variations of Lateral Raises on Cable Machine
Here are some variations of lateral raises on cable machine:
- Single-arm lateral raise: Use only one arm at a time and alternate between arms.
- Reverse lateral raise: Stand facing away from the cable machine and lift the weight behind you.
- High cable lateral raise: Adjust the pulley to the highest setting and lift the weight above your head.
- Low to high cable lateral raise: Adjust the pulley to the lowest setting and lift the weight diagonally from your hip to above your head.
Benefits of Lateral Raises on Cable Machine

Here are some benefits of lateral raises on cable machine:
- Builds shoulder muscles: This exercise targets the medial deltoid, which is the middle part of the shoulder muscle.
- Improves posture: Stronger shoulder muscles can improve your posture and reduce the risk of rounded shoulders.
- Reduces the risk of injury: Strengthening your shoulder muscles can help prevent shoulder injuries such as rotator cuff tears.
- Increases range of motion: This exercise can help increase your shoulder joint's range of motion, improving your flexibility.
- Easy to modify: Lateral raises on cable machine can be easily modified by adjusting the weight, pulley height, or adding variations.
Conclusion
Lateral raises on cable machine is an effective exercise for building shoulder muscles and improving posture. By following the proper form and technique, you can reduce the risk of shoulder injuries and increase your shoulder joint's range of motion. Remember to start with a lighter weight and gradually increase as you get stronger. Try out the different variations to keep your workout interesting and challenging.
Related video of Lateral Raises on Cable Machine
Neutral grip shoulder press is an exercise that has gained popularity in recent years. It is a variation of the traditional shoulder press that utilizes a neutral grip, which is easier on the shoulder joint. In this article, we will discuss the muscles worked during a neutral grip shoulder press.
What is Neutral Grip Shoulder Press?

A neutral grip shoulder press is a variation of the traditional shoulder press. Instead of using a pronated or supinated grip, a neutral grip is utilized. This means that the palms face each other during the exercise. The neutral grip is easier on the shoulder joint and is a great alternative for those who experience discomfort during a traditional shoulder press.
Muscles Worked During Neutral Grip Shoulder Press

The neutral grip shoulder press primarily targets the shoulder muscles. The three main shoulder muscles worked during this exercise are the anterior deltoid, the medial deltoid, and the posterior deltoid. These three muscles make up the deltoid muscle group, which is responsible for shoulder abduction, flexion, and rotation.
In addition to the deltoid muscles, the trapezius muscle is also worked during a neutral grip shoulder press. The trapezius muscle is located in the upper back and is responsible for shoulder elevation and retraction.
The rotator cuff muscles, which are a group of four muscles that stabilize the shoulder joint, are also activated during a neutral grip shoulder press. These muscles include the supraspinatus, infraspinatus, teres minor, and subscapularis.
Benefits of Neutral Grip Shoulder Press

Neutral grip shoulder press offers several benefits over traditional shoulder press. One of the main benefits is that it is easier on the shoulder joint. This is because the neutral grip allows for a more natural range of motion, which reduces the amount of stress placed on the shoulder joint.
Neutral grip shoulder press also allows for greater activation of the deltoid muscles. This is because the neutral grip places the hands in a more natural position, which allows for greater recruitment of the deltoid muscles.
Another benefit of neutral grip shoulder press is that it can help to improve shoulder stability. This is because the neutral grip requires greater activation of the rotator cuff muscles, which help to stabilize the shoulder joint during the exercise.
How to Perform Neutral Grip Shoulder Press

To perform a neutral grip shoulder press, follow these steps:
- Stand with your feet shoulder-width apart and hold a pair of dumbbells at shoulder height with your palms facing each other.
- Press the dumbbells overhead, keeping your elbows close to your body.
- Lower the dumbbells back to shoulder height and repeat for the desired number of repetitions.
Remember to keep your core engaged and your back straight throughout the exercise.
Conclusion
Neutral grip shoulder press is a great exercise for targeting the shoulder muscles while reducing stress on the shoulder joint. By incorporating this exercise into your workout routine, you can help to improve shoulder stability and overall shoulder strength. Remember to always use proper form and start with a weight that is appropriate for your fitness level.
Related video of Neutral Grip Shoulder Press Muscles Worked

If you're looking for an exercise that targets multiple muscle groups at once, the lunge to overhead press is a great option. This compound exercise works your legs, glutes, shoulders, and core all in one movement. In this article, we'll break down the proper form for the lunge to overhead press and provide some tips for getting the most out of this exercise.
How To Do A Lunge To Overhead Press

To perform a lunge to overhead press, follow these steps:
- Start by standing with your feet hip-distance apart, holding a pair of dumbbells at your sides.
- Take a step forward with your right foot and lower your body down into a lunge position. Your right knee should be directly above your ankle, and your left knee should be hovering just above the ground.
- As you come up from the lunge, press the dumbbells overhead, extending your arms fully.
- Lower the dumbbells back down to your sides as you step back to the starting position.
- Repeat on the other side, stepping forward with your left foot.
It's important to maintain proper form throughout the movement. Keep your core engaged, your back straight, and your shoulders relaxed. Make sure your knee doesn't extend beyond your toes in the lunge position, and keep your elbows close to your body as you press the dumbbells overhead.
Tips For Getting The Most Out Of Your Lunge To Overhead Press

Here are some tips to help you maximize the benefits of the lunge to overhead press:
- Start with light weights until you feel comfortable with the movement. You can always increase the weight as you get stronger.
- Focus on your breathing. Inhale as you step forward into the lunge, and exhale as you press the dumbbells overhead.
- Keep your core engaged throughout the movement to protect your lower back.
- Don't let your front knee collapse inward when you step forward into the lunge. Keep it in line with your ankle.
- If you have knee pain, try modifying the exercise by stepping back into a reverse lunge instead of a forward lunge.
The Benefits Of The Lunge To Overhead Press

The lunge to overhead press is a great exercise for several reasons:
- It targets multiple muscle groups at once, making it an efficient use of your time in the gym.
- It can help improve your balance and coordination.
- It's a weight-bearing exercise, which can help improve bone density.
- It's a functional movement that mimics activities of daily life, like lifting groceries or reaching for something on a high shelf.
Incorporating The Lunge To Overhead Press Into Your Workout Routine

The lunge to overhead press can be incorporated into a full-body workout or used as a standalone exercise. Here's an example of how you might include it in a workout:
- Warm up with five minutes of light cardio, like jogging or jumping jacks.
- Do three sets of 10-12 reps of lunge to overhead press, resting for 30 seconds between sets.
- Move on to another exercise, like push-ups or squats, and repeat for three sets.
- Finish with a cool-down stretch.
Remember to listen to your body and modify as needed. If you experience pain or discomfort, take a break or try a modified version of the exercise.
Related video of Lunge To Overhead Press: A Complete Guide

The IT band, or iliotibial band, is a thick band of fascia that runs along the outside of the thigh from the hip to the knee. It helps stabilize the knee during movement and can become tight and inflamed due to overuse or poor biomechanics. Foam rolling is a popular method for releasing tension in the IT band and can be used as a preventive measure or as part of a rehab program. In this article, we will explore some effective IT band stretches using a foam roller.
Why Use a Foam Roller?

Foam rolling is a self-myofascial release technique that uses a foam roller to apply pressure to tight or sore muscles. It can help increase blood flow, improve flexibility, and reduce muscle soreness. Foam rolling has been shown to be effective in reducing IT band tightness and can be used as a complementary therapy to other treatments such as stretching and strengthening exercises.
How to Use a Foam Roller for IT Band Stretches

To use a foam roller for IT band stretches, follow these steps:
- Lie on your side with the foam roller under your hip and the affected leg crossed over the other leg.
- Slowly roll down from your hip to just above your knee, pausing on any tender spots.
- Roll back up to your hip and repeat for 10-15 repetitions.
- To target different areas of the IT band, adjust the angle of your leg or use a smaller foam roller.
Other Foam Roller Stretches for the IT Band

In addition to the basic foam roller stretch described above, there are several other foam roller stretches that can help release tension in the IT band:
- Foam Roller Calf Stretch: Sit with your legs extended in front of you and the foam roller under your calves. Roll up and down from your ankles to just below your knees, pausing on any tender spots.
- Foam Roller Glute Stretch: Sit on the foam roller with one ankle crossed over the opposite knee. Roll back and forth over the glute muscles, pausing on any tender spots.
- Foam Roller Quad Stretch: Lie face down with the foam roller under your thighs. Roll up and down from your hips to just above your knees, pausing on any tender spots.
Precautions

While foam rolling can be an effective way to release tension in the IT band, there are some precautions to keep in mind:
- Don't roll directly over bony areas such as the knee joint or hip bones.
- Use a moderate amount of pressure and avoid rolling too aggressively.
- If you experience pain, stop immediately and consult a healthcare professional.
Conclusion
Foam rolling is a simple and effective way to release tension in the IT band and can be used as part of a comprehensive rehab program or as a preventive measure. By following the proper precautions and techniques, you can safely incorporate foam rolling into your fitness routine and improve your overall mobility and flexibility.

Related video ofIT Band Stretches Foam Roller
If you're looking for a great way to target your upper back muscles, the dumbbell straight arm pull back is an excellent exercise to consider. This exercise is designed to help you strengthen your back and improve your posture. In this article, we'll take a closer look at the dumbbell straight arm pull back and how you can perform it correctly.
What Is the Dumbbell Straight Arm Pull Back?
The dumbbell straight arm pull back is a resistance exercise that targets the upper back muscles. It is performed using a set of dumbbells and can be done in a standing or seated position. The exercise involves pulling the dumbbells behind your body with your arms fully extended, targeting the rhomboids, lats, and traps.
How to Perform the Dumbbell Straight Arm Pull Back

Here's how to perform the dumbbell straight arm pull back:
- Begin by standing or sitting with your feet shoulder-width apart and your back straight. Hold a dumbbell in each hand with your arms fully extended in front of you, palms facing in.
- Slowly pull the dumbbells back behind your body, keeping your arms straight and your elbows locked. Squeeze your shoulder blades together as you pull back.
- Hold for a second at the top of the movement, then slowly return to the starting position.
- Repeat for the desired number of repetitions.
It's important to keep your arms straight throughout the movement to target the upper back muscles effectively. Also, be sure to use a weight that challenges you without compromising your form.
Variations of the Dumbbell Straight Arm Pull Back
There are several variations of the dumbbell straight arm pull back that you can try to add variety to your workout:
- Seated dumbbell straight arm pull back
- Single-arm dumbbell straight arm pull back
- Alternating dumbbell straight arm pull back
- Resistance band straight arm pull back
Each of these variations targets the upper back muscles but provides a slightly different challenge to your body.
Tips for Performing the Dumbbell Straight Arm Pull Back
Here are a few tips to keep in mind when performing the dumbbell straight arm pull back:
- Keep your back straight and your core engaged throughout the movement.
- Use a weight that challenges you without compromising your form.
- Don't swing the dumbbells or use momentum to lift the weight.
- Focus on squeezing your shoulder blades together as you pull the dumbbells back.
- Breathe in as you pull the dumbbells back and exhale as you return to the starting position.
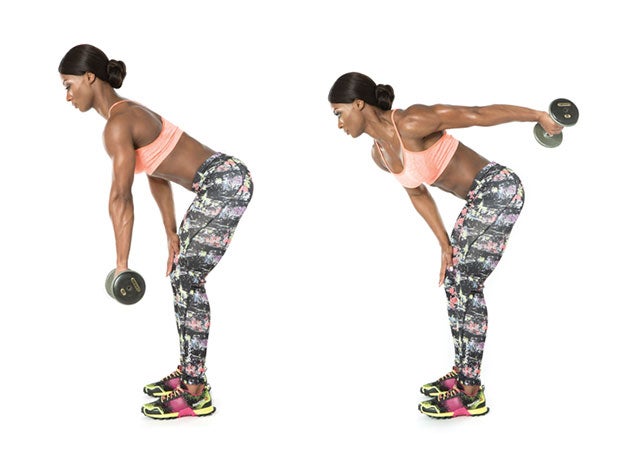
Benefits of the Dumbbell Straight Arm Pull Back
The dumbbell straight arm pull back offers several benefits, including:
- Targeting the upper back muscles
- Improving posture
- Strengthening the rhomboids, lats, and traps
- Helping to prevent back pain
- Increasing upper body strength
Incorporating the Dumbbell Straight Arm Pull Back into Your Workout
The dumbbell straight arm pull back can be incorporated into your upper body workout routine. It's best to perform this exercise after your compound exercises, such as bench press or rows. Aim to perform 3-4 sets of 10-15 repetitions, using a weight that challenges you.
Conclusion
The dumbbell straight arm pull back is an effective exercise for targeting the upper back muscles and improving posture. By following the correct form and incorporating this exercise into your workout routine, you can strengthen your back and prevent back pain. Give this exercise a try and see how it can benefit your upper body strength and overall fitness.