
If you're looking for a compound exercise that targets your back and biceps, look no further than the close grip bent over row. This exercise is perfect for building strength and muscle mass in your upper body, and it's easy to incorporate into your workout routine. In this article, we'll take a closer look at the close grip bent over row and show you how to perform it correctly for maximum results.
What is a Close Grip Bent Over Row?

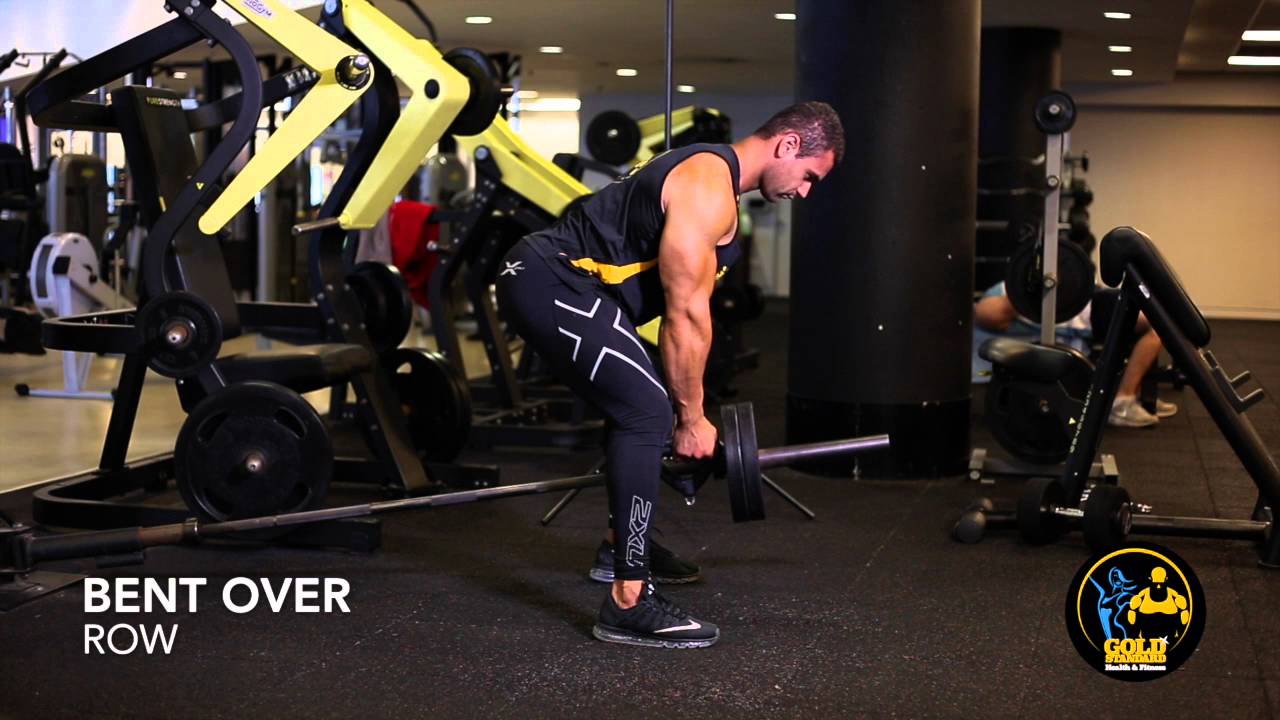
The close grip bent over row is a compound exercise that primarily targets your back and biceps. To perform this exercise, you'll need a barbell and a flat bench. You'll start by standing with your feet shoulder-width apart and your knees slightly bent. Then, you'll bend over at the waist and grip the barbell with your hands close together, palms facing down. From there, you'll pull the barbell up towards your chest, keeping your elbows close to your body.
Benefits of Close Grip Bent Over Rows

There are many benefits to incorporating close grip bent over rows into your workout routine. First and foremost, this exercise targets your back and biceps, which are important muscle groups for overall upper body strength. Additionally, the close grip bent over row is a compound exercise, which means it works multiple muscle groups at once. This can help you build muscle mass and increase your overall strength.
How to Perform Close Grip Bent Over Rows
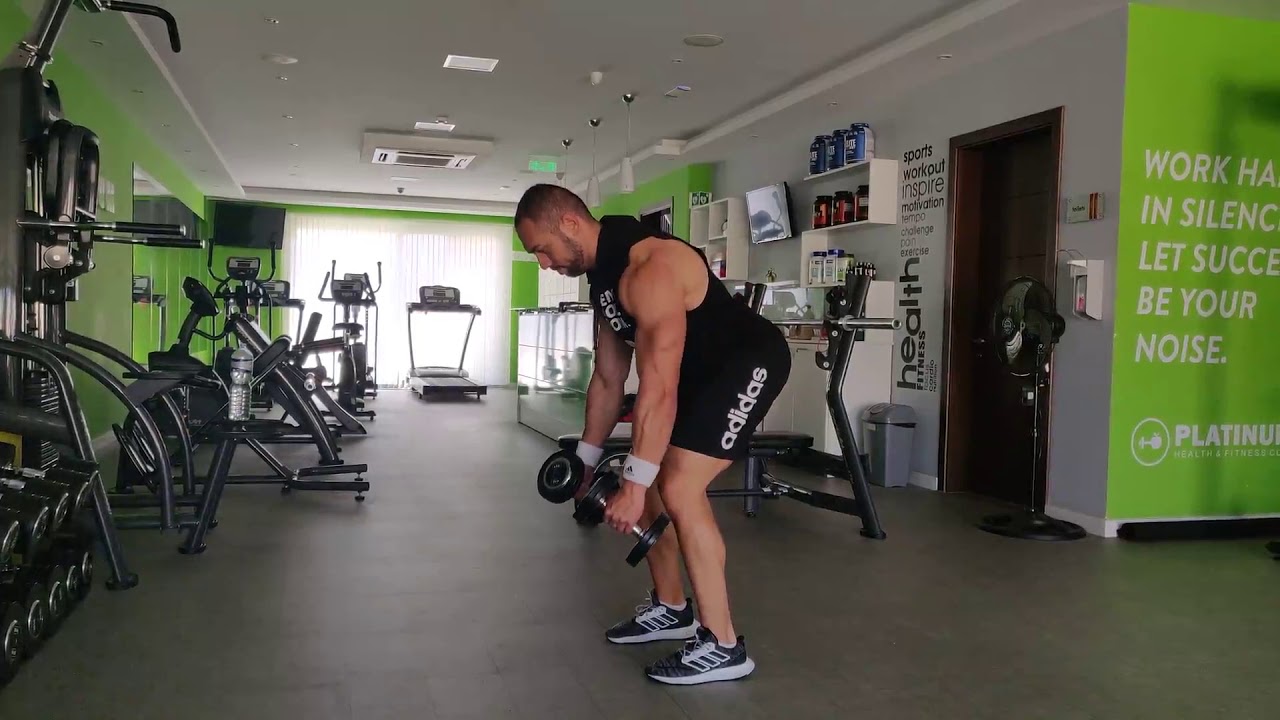
Performing the close grip bent over row correctly is important to prevent injury and get the most out of the exercise. Follow these steps to perform the close grip bent over row:
- Stand with your feet shoulder-width apart and your knees slightly bent.
- Bend over at the waist and grip the barbell with your hands close together, palms facing down.
- Pull the barbell up towards your chest, keeping your elbows close to your body.
- Lower the barbell back down to the starting position, keeping your back straight and your abs engaged.
- Repeat for the desired number of reps.
Variations of Close Grip Bent Over Rows

There are many variations of the close grip bent over row that you can incorporate into your workout routine. Some popular variations include:
- Underhand grip bent over row
- T-bar row
- One-armed dumbbell row
- Seated cable row
- Reverse grip bent over row
By incorporating these variations into your workout routine, you can target different muscle groups and keep your workouts interesting and challenging.
Tips for Success
When performing close grip bent over rows, it's important to keep a few tips in mind to maximize your results and prevent injury:
- Engage your abs and keep your back straight throughout the exercise.
- Keep your elbows close to your body to target your back and biceps.
- Use a weight that challenges you, but that you can lift with proper form.
- Breathe in as you pull the barbell up, and exhale as you lower it back down.
- Warm up properly before performing close grip bent over rows to prevent injury.
Incorporating Close Grip Bent Over Rows into Your Workout Routine

If you're looking to build your back and biceps, incorporating close grip bent over rows into your workout routine is a great way to do so. Here's an example of how you can incorporate close grip bent over rows into your workout:
- Warm up with five minutes of light cardio.
- Perform three sets of 10-12 close grip bent over rows.
- Rest for 30 seconds between sets.
- Perform three sets of 10-12 chin-ups or lat pulldowns.
- Rest for 30 seconds between sets.
- Perform three sets of 10-12 dumbbell bicep curls.
- Cool down with five minutes of stretching.
By incorporating close grip bent over rows into your workout routine, you can build strength and muscle mass in your back and biceps, helping you achieve your fitness goals.
Conclusion
The close grip bent over row is a compound exercise that targets your back and biceps, making it a great addition to any upper body workout routine. By following the correct form and incorporating variations and tips, you can maximize your results and prevent injury. So next time you hit the gym, be sure to add close grip bent over rows to your workout routine.
Related video of Close Grip Bent Over Rows: Build Your Back and Biceps with this Compound Exercise

Are you looking for an exercise that can target your chest muscles effectively? If yes, then the decline chest fly cable is the one for you. It is an isolation exercise that primarily targets the pectoralis major muscle, which is responsible for the movement of the arm towards the center of the body.
How to Perform Decline Chest Fly Cable

Before you start performing this exercise, make sure to adjust the cable machine to a low position. Lie down on the bench, and grab the handles with an overhand grip. Keep your arms straight and parallel to the floor.
Now, slowly lower your arms towards the floor, keeping them slightly bent. Make sure to keep your elbows locked in position and your wrists straight. When your arms are at shoulder level, pause for a second, and then slowly return to the starting position.
Repeat this exercise for 3-4 sets of 10-12 reps. You can also increase or decrease the weight as per your preference.
Benefits of Decline Chest Fly Cable

There are several benefits of performing decline chest fly cable, including:
- Targets the chest muscles effectively
- Improves chest strength and size
- Helps in developing a well-defined chest
- Improves shoulder stability
- Helps in preventing injuries
Mistakes to Avoid

While performing decline chest fly cable, make sure to avoid the following mistakes:
- Using too much weight
- Performing the exercise too quickly
- Not keeping the elbows locked in position
- Not keeping the wrists straight
- Not breathing properly
Variations of Decline Chest Fly Cable

There are several variations of decline chest fly cable that you can perform to target different areas of your chest muscles. Some of the popular variations include:
- Incline chest fly cable
- Standing chest fly cable
- Single arm chest fly cable
- Reverse grip chest fly cable
Conclusion
Decline chest fly cable is an excellent exercise that can help you target your chest muscles effectively. By following the proper technique and avoiding the common mistakes, you can improve your chest strength and size, and develop a well-defined chest.
Related video of Decline Chest Fly Cable: The Ultimate Guide

The rotator cuff is a group of muscles and tendons in the shoulder that help to stabilize and move the joint. One of the key movements of the rotator cuff is external rotation, which involves rotating the arm away from the body. This movement is important for many activities, such as throwing a ball, reaching for something on a high shelf, or even just brushing your hair.
Why External Rotation is Important

External rotation is important for several reasons. First, it helps to maintain proper alignment of the shoulder joint, which can help prevent injuries. Second, it is necessary for many everyday activities, such as reaching for something on a high shelf or driving a car. Finally, external rotation is essential for athletes who rely on overhead throwing movements, such as baseball players or volleyball players.
How to Perform External Rotation
:max_bytes(150000):strip_icc()/the-rotator-cuff-2696385-FINAL1-474e476cc4554dbd97995610f4402577.png)
External rotation is performed by lying on your side with your elbow bent to 90 degrees and your forearm resting on the ground. You can use a light weight or resistance band to add resistance to the movement. Slowly rotate your arm away from your body, keeping your elbow at your side. Hold for a few seconds, then slowly return to the starting position. Repeat for several repetitions, then switch sides.
Common Mistakes to Avoid

One common mistake when performing external rotation is allowing your elbow to move away from your side. This can put extra stress on your shoulder joint and increase your risk of injury. Another mistake is using too much weight or resistance, which can cause you to lose control of the movement and potentially injure yourself.
Tips for a Successful External Rotation

Here are some tips to help you perform external rotation safely and effectively:
- Start with a light weight or resistance band, and gradually increase the weight or resistance as you get stronger.
- Keep your elbow at your side throughout the movement, and avoid letting it drift away from your body.
- Use slow, controlled movements to avoid jerking or using momentum to complete the exercise.
- If you experience any pain or discomfort, stop the exercise and consult a healthcare professional.
Other Exercises for the Rotator Cuff

External rotation is just one of several exercises that can help strengthen the rotator cuff. Other exercises include internal rotation, shoulder abduction, and shoulder extension. It is important to perform a variety of exercises to ensure that all of the muscles in the rotator cuff are strengthened and balanced.
Conclusion
External rotation is an important movement for the health and function of the shoulder joint. By performing this exercise regularly and correctly, you can help prevent injuries and improve your strength and mobility. Remember to start with a light weight or resistance band, keep your elbow at your side, use slow, controlled movements, and consult a healthcare professional if you experience any pain or discomfort.
Related video of Rotator Cuff External Rotation

The side fire hydrant exercise is a popular exercise that helps strengthen and tone the hips and glutes. This exercise is easy to do and can be done anywhere, making it a great addition to any workout routine. In this article, we will discuss the benefits of the side fire hydrant exercise and how to perform it correctly.
Benefits of the Side Fire Hydrant Exercise

The side fire hydrant exercise has several benefits, including:
- Strengthening the hips and glutes
- Improving balance and stability
- Reducing the risk of injury
- Toning the thighs and lower back
- Improving overall body strength
By incorporating the side fire hydrant exercise into your workout routine, you can improve your overall health and fitness.
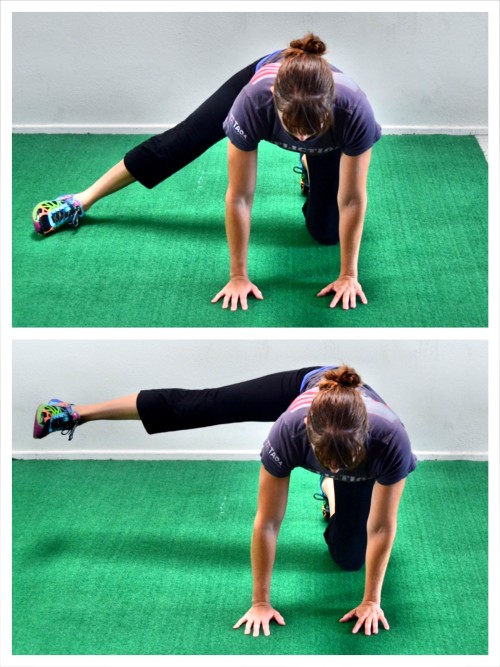
How to Perform the Side Fire Hydrant Exercise
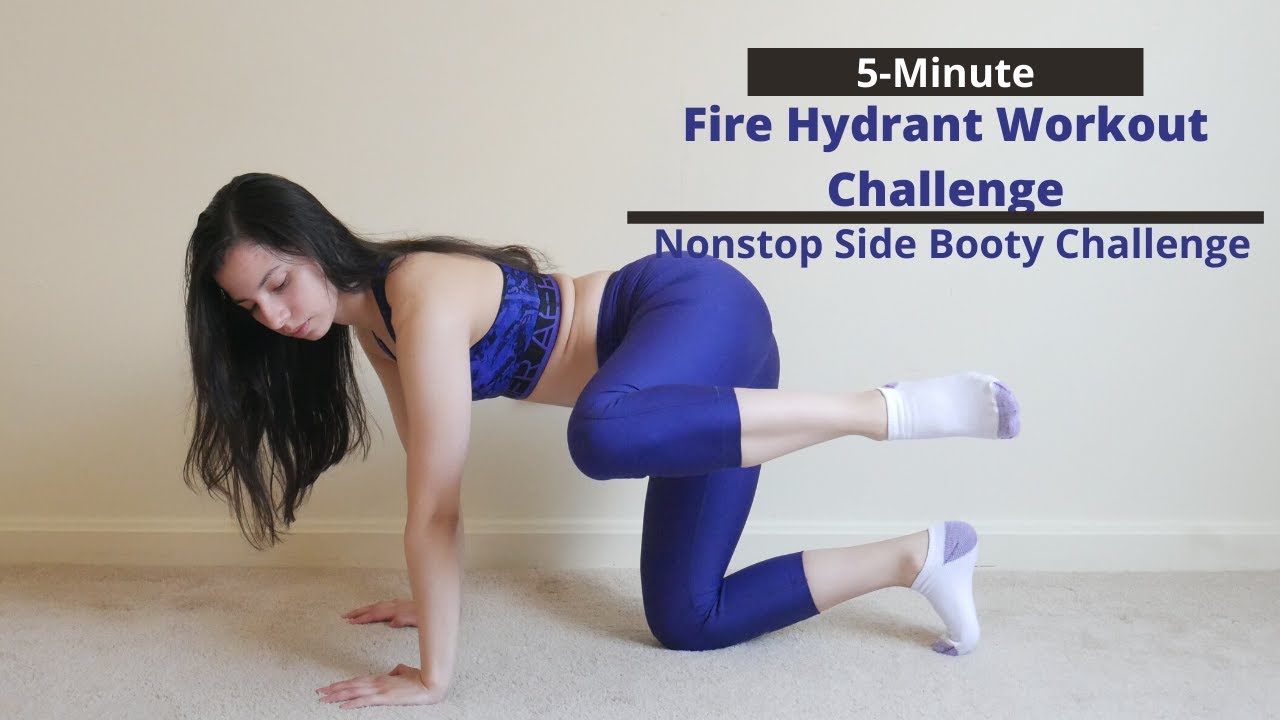
To perform the side fire hydrant exercise, follow these steps:
- Start on all fours with your hands directly under your shoulders and your knees directly under your hips.
- Keeping your knee bent, lift one leg out to the side, keeping your foot flexed.
- Slowly lower your leg back down to the starting position.
- Repeat on the other side.
Make sure to keep your core engaged throughout the exercise and to breathe deeply. You can also add ankle weights to increase the intensity of the exercise.
Tips for Performing the Side Fire Hydrant Exercise
To get the most out of the side fire hydrant exercise, follow these tips:
- Perform the exercise slowly and with control
- Keep your core engaged throughout the exercise
- Breathe deeply and evenly throughout the exercise
- Start with a few repetitions and gradually increase as you become stronger
- Do not push yourself too hard and stop if you feel pain or discomfort
By following these tips, you can perform the side fire hydrant exercise safely and effectively.
Variations of the Side Fire Hydrant Exercise

There are several variations of the side fire hydrant exercise that you can try to add variety to your workout routine. Some of these variations include:
- Side fire hydrant with leg extension
- Side fire hydrant with knee extension
- Side fire hydrant with pulse
- Side fire hydrant with heel lift
By trying these variations, you can target different areas of the hips and glutes for a more complete workout.
Incorporating the Side Fire Hydrant Exercise into Your Workout Routine

The side fire hydrant exercise can be incorporated into your workout routine in several ways. You can perform it as a standalone exercise or as part of a larger workout. Some ways to incorporate the side fire hydrant exercise into your workout routine include:
- Performing 3 sets of 10 repetitions on each side
- Adding ankle weights to increase the intensity of the exercise
- Supersetting the side fire hydrant exercise with another lower body exercise
- Performing the side fire hydrant exercise as part of a full body workout
By incorporating the side fire hydrant exercise into your workout routine, you can improve your overall health and fitness.
Conclusion
The side fire hydrant exercise is an effective exercise for strengthening and toning the hips and glutes. By following the tips and variations outlined in this article, you can perform the exercise safely and effectively. Incorporate the side fire hydrant exercise into your workout routine for improved overall health and fitness.
Related video of Side Fire Hydrant Exercise for Stronger and Firmer Hips

One-legged squats on a bench, also known as Bulgarian split squats, are a popular exercise among athletes and fitness enthusiasts. This exercise targets the quads, glutes, and hamstrings, making it an excellent lower body workout. It is important to perform this exercise with proper form to prevent injury and to get the most out of the exercise.
How to Perform One Legged Squats On Bench

To perform one-legged squats on a bench, follow these steps:
- Stand with your back facing the bench.
- Place one foot on the bench behind you, with your toes pointing down.
- Place your hands on your hips or hold dumbbells at your sides.
- Lower your body by bending your front leg until your thigh is parallel to the ground.
- Push through your front heel to stand back up.
- Repeat for the desired number of reps, then switch legs.
Tips for Proper Form

Proper form is crucial for getting the most out of one-legged squats on a bench and preventing injury. The following tips can help you maintain proper form:
- Keep your chest up and your back straight throughout the exercise.
- Keep your knee in line with your toes to prevent twisting and strain on your knee.
- Don't let your front knee go past your toes.
- Keep your core engaged to help maintain balance.
- Start with a lower bench height and work your way up to a higher bench as you get stronger.
Variations of One Legged Squats On Bench

There are several variations of one-legged squats on a bench that you can try to add variety to your workout:
- Hold a dumbbell in each hand for added resistance.
- Perform the exercise with your back foot elevated on a step or box.
- Hold a medicine ball or kettlebell at your chest.
- Perform the exercise with your front foot on a stability ball to engage your core and improve balance.
Benefits of One Legged Squats On Bench

One-legged squats on a bench offer several benefits, including:
- Strengthening the quads, glutes, and hamstrings.
- Improving balance and stability.
- Working the core muscles.
- Increasing lower body strength and power.
- Challenging your body in a different way than traditional squats.
Incorporating One Legged Squats On Bench Into Your Workout

One-legged squats on a bench can be incorporated into your lower body workout routine in several ways:
- Perform them as part of a circuit, alternating with other lower body exercises.
- Perform them as a standalone exercise, doing several sets of 8-12 reps on each leg.
- Superset one-legged squats with a upper body exercise, such as push-ups or rows.
- Use them as a warm-up exercise before heavier squatting or deadlifting.
Conclusion
One-legged squats on a bench are a challenging but effective lower body exercise that can help you improve your strength, balance, and stability. By following proper form and incorporating variations into your workouts, you can get the most out of this exercise and take your fitness to the next level.
Related video of One Legged Squats On Bench

Hip flexor stretches are a great way to improve flexibility and reduce pain in the hip region. Many people experience tightness in this area due to prolonged sitting, lack of exercise, or repetitive movements. By incorporating hip flexor stretches into your daily routine, you can experience a wide range of benefits for your overall health and wellbeing.
Improved Flexibility

One of the most significant benefits of hip flexor stretches is improved flexibility. When your hip flexors are tight, it can limit your range of motion and make it difficult to perform certain movements. By stretching these muscles regularly, you can increase your flexibility and reduce the risk of injury during exercise or daily activities.
Reduced Pain

Tight hip flexors can also cause pain in the lower back, hips, and knees. By stretching these muscles, you can relieve tension and reduce pain in these areas. This can be especially beneficial for individuals who sit for extended periods or participate in activities that require repetitive hip flexor movements.
Improved Posture

Tight hip flexors can also affect your posture by pulling your pelvis forward and causing your lower back to arch. By stretching these muscles, you can improve your posture and reduce the risk of developing back pain or discomfort.
Increased Strength

Hip flexor stretches can also help increase your strength and improve your athletic performance. By stretching these muscles, you can improve your hip mobility and increase your power and explosiveness during exercises such as squats, lunges, and jumps.
Better Circulation

Hip flexor stretches can also improve your circulation by increasing blood flow to the hip region. This can help reduce inflammation and promote healing in the muscles and surrounding tissues.
Reduced Stress

Stretching, in general, can help reduce stress and promote relaxation in the body. By incorporating hip flexor stretches into your daily routine, you can help reduce tension and promote a sense of calm and wellbeing.
Improved Balance

Tight hip flexors can also affect your balance and stability. By stretching these muscles, you can improve your balance and reduce the risk of falls or injuries.
Reduced Risk of Injury

By improving your flexibility and strength through hip flexor stretches, you can also reduce the risk of injury during physical activity. This can be especially important for athletes or individuals who participate in high-impact sports or activities.
Improved Digestion

Hip flexor stretches can also promote better digestion by reducing tension and tightness in the abdominal area. This can help improve circulation to the digestive organs and reduce discomfort or bloating.
Reduced Headaches

Tight hip flexors can also contribute to tension headaches by pulling on the lower back and neck muscles. By stretching these muscles, you can reduce tension in these areas and promote relaxation throughout the body.
Improved Sleep

Stretching, in general, can also promote better sleep by reducing tension and promoting relaxation in the body. By incorporating hip flexor stretches into your bedtime routine, you can help improve the quality of your sleep and wake up feeling more refreshed and energized.
Increased Energy

Stretching and exercise, in general, can also increase your energy levels by promoting circulation and releasing endorphins in the body. By incorporating hip flexor stretches into your daily routine, you can promote a sense of vitality and improve your overall wellbeing.
Improved Overall Health

By improving your flexibility, reducing pain and tension, and promoting relaxation and wellbeing, hip flexor stretches can have a wide range of benefits for your overall health and wellbeing. By incorporating these stretches into your daily routine, you can improve your quality of life and reduce the risk of developing chronic pain or health conditions.
Related video of Hip Flexor Stretch Benefits
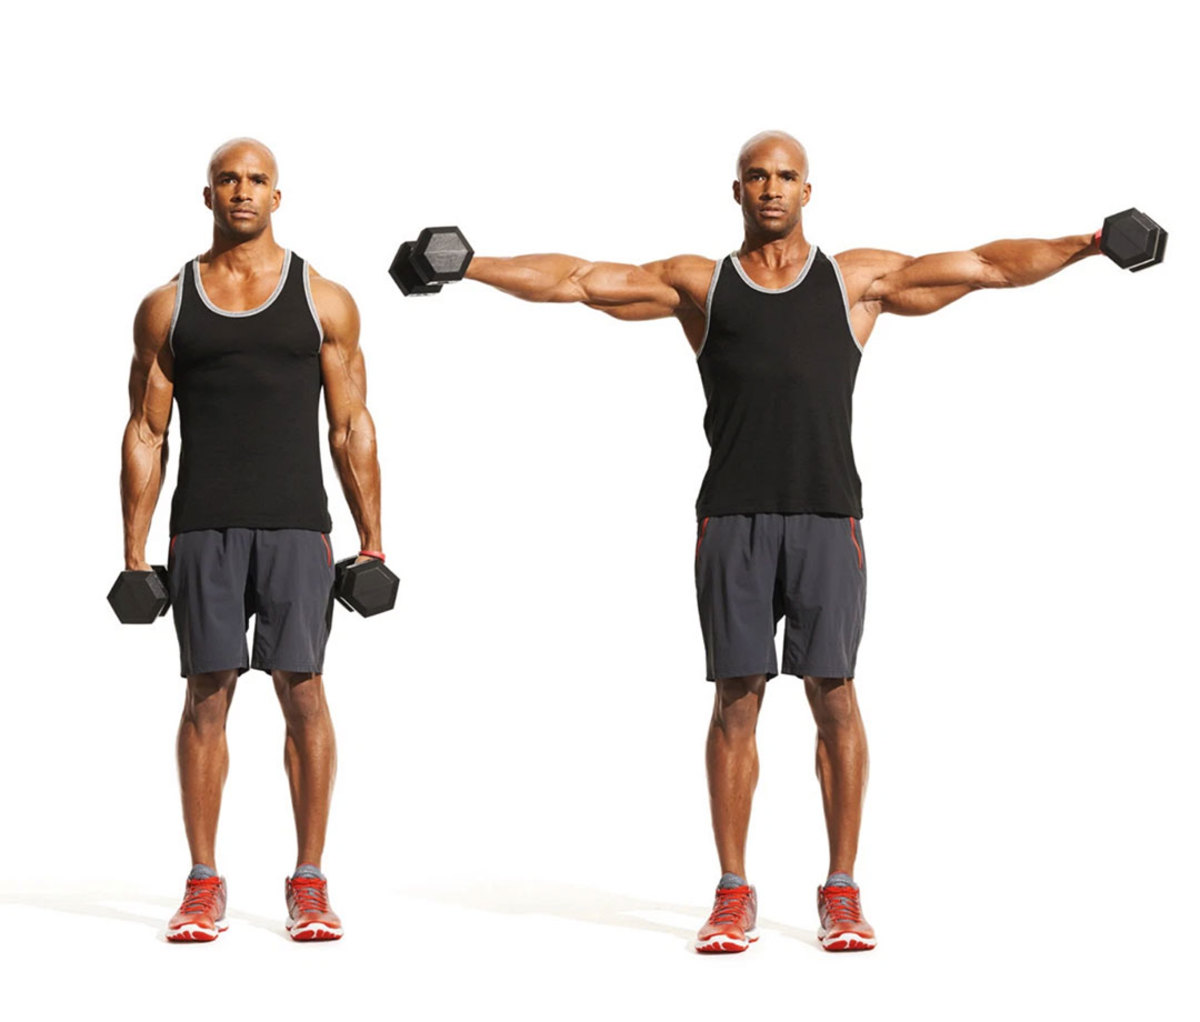
If you're looking to strengthen your upper back and shoulders, the dumbbell rear lateral raise is an excellent exercise to add to your routine. This exercise targets the muscles in your mid and upper back, as well as your shoulders, helping to improve posture and reduce the risk of injury.
How to Perform a Dumbbell Rear Lateral Raise
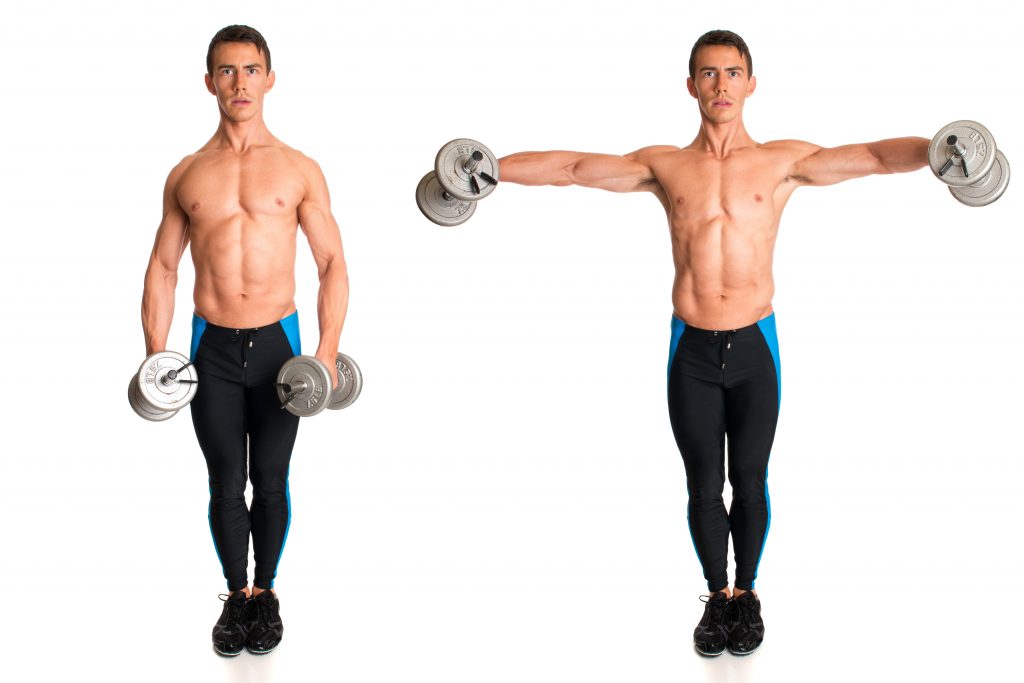
To perform a dumbbell rear lateral raise:
- Stand with your feet shoulder-width apart, holding a dumbbell in each hand.
- Bend forward at the hips, keeping your back straight and your head up.
- Slowly lift the weights out to the sides, keeping your elbows slightly bent.
- Pause when your arms are parallel to the ground.
- Slowly lower the weights back down to the starting position.
- Repeat for 3 sets of 10-12 reps.
Benefits of Dumbbell Rear Lateral Raises

There are many benefits to adding dumbbell rear lateral raises to your workout routine:
- Strengthens the muscles in your upper back and shoulders
- Improves posture
- Reduces the risk of injury
- Increases shoulder mobility
- Helps to prevent shoulder impingement
Dumbbell Rear Lateral Raise Variations

There are several variations of the dumbbell rear lateral raise that you can try to target different muscles and add variety to your workout:
- Bent-Over Reverse Fly: Instead of lifting the weights straight out to the sides, lift them diagonally backwards, focusing on squeezing your shoulder blades together.
- Single-Arm Rear Lateral Raise: Hold the weight in one hand and lift it out to the side, then repeat on the other side.
- Incline Rear Lateral Raise: Lie face down on an incline bench and lift the weights out to the sides, focusing on squeezing your shoulder blades together.
Common Mistakes to Avoid

When performing dumbbell rear lateral raises, it's important to avoid these common mistakes:
- Using too much weight
- Not keeping your back straight
- Not keeping your head up
- Not lifting the weights high enough
- Raising your arms too quickly
Conclusion
The dumbbell rear lateral raise is a simple yet effective exercise that can help you improve your upper back and shoulder strength, posture, and mobility. By following proper form and avoiding common mistakes, you can reap the many benefits of this exercise and take your fitness routine to the next level.
Related video of Dumbbell Rear Lateral Raise: Exercise Guide, Benefits, and Variations

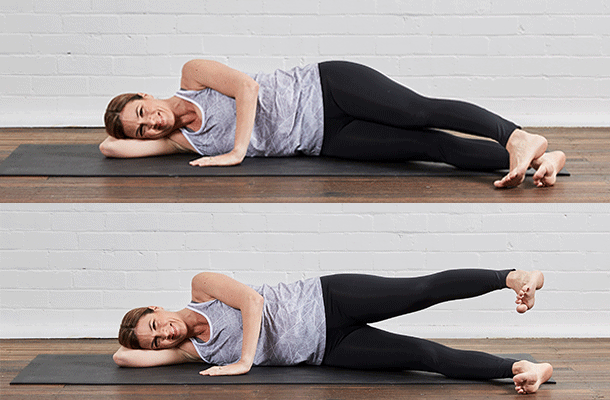
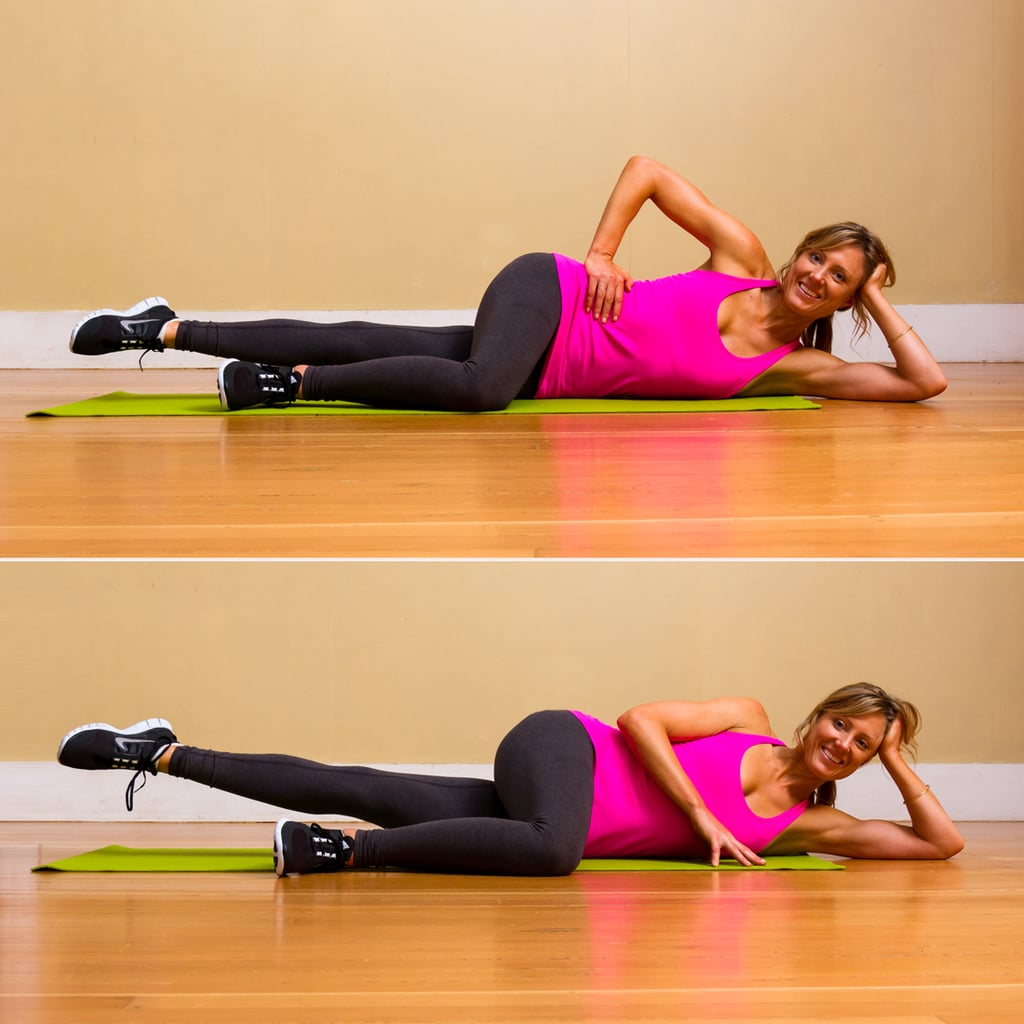
Side leg lifts are a popular exercise that can be done at home or in the gym. They are an effective way to work your hip abductor muscles, which are responsible for moving your leg away from your body. Side leg lifts can also help to tone your glutes and improve your balance.
How to Do Side Leg Lifts

To do side leg lifts, start by lying on your side with your legs straight. You can support your head with your hand or rest it on your arm. Next, lift your top leg as high as you can without moving your hips. Pause for a moment at the top, then lower your leg back down. Repeat for several repetitions, then switch sides and repeat with your other leg.
You can also do side leg lifts while standing. To do this, stand with your feet shoulder-width apart and your hands on your hips. Lift one leg out to the side as high as you can, then lower it back down. Repeat for several repetitions, then switch sides and repeat with your other leg.
Benefits of Side Leg Lifts

Side leg lifts are a great way to target your hip abductor muscles, which are often neglected in traditional leg exercises. By strengthening these muscles, you can improve your balance and stability, which can help to prevent falls and injuries.
In addition, side leg lifts can help to tone your glutes and improve the overall appearance of your legs. They are a low-impact exercise that can be done by people of all fitness levels, making them a great addition to any workout routine.
Variations of Side Leg Lifts

There are several variations of side leg lifts that you can try to add variety to your workout. One variation is to add ankle weights or resistance bands to increase the intensity of the exercise. Another variation is to do the exercise on an unstable surface, such as a balance ball, to challenge your core muscles.
You can also try doing side leg lifts with a pulse. To do this, lift your leg as high as you can, then pulse it up and down several times before lowering it back down.
Precautions
While side leg lifts are generally safe for most people, there are a few precautions you should take to avoid injury. If you have any pre-existing hip or knee injuries, you should consult with your doctor before doing this exercise.
In addition, it's important to maintain proper form throughout the exercise to avoid straining your lower back or other muscles. Make sure to keep your hips stacked and your core engaged throughout the movement.
Conclusion
Side leg lifts are a great exercise for improving your hip abductor strength, balance, and glute tone. They are easy to do and can be modified to suit your fitness level. By incorporating side leg lifts into your workout routine, you can improve your overall fitness and prevent injuries.